MG-Cars.info
MG Midget and Sprite Technical Peened rivet things BBS discussion at MG-Cars.info

MG-Cars.info
Welcome to our Site for MG, Triumph and Austin-Healey Car Information.
Recommendations
Parts
MG parts spares and accessories are available for MG T Series (TA, MG TB, MG TC, MG TD, MG TF), Magnette, MGA, Twin cam, MGB, MGBGT, MGC, MGC GT, MG Midget, Sprite and other MG models from British car spares company LBCarCo.
MG Midget and Sprite Technical - Peened rivet things
| What is the best way of removing and refitting a peened rivet?
I will explain. One of the bonnet stays on my frog is very erratic about latching. They are telescopic, a bit like a later car boot stay, but should be automatic, alternately catching and releasing as the bonnet is lifted. This one only catches on about the 10th or 15th lift. There is a star shaped latching piece that spins on a pivot. It's worn. I need to remove this, rebuild the wear with weld, reshape, refit. The pivot is like a fat rivet, possibly with a lose collar/ spacer, then peened over flush on the back of the stay. To remove, I would need to drill off the peened lip but if I do this, how do I refit it? It might weld but I think it is an alloy. |
| GuyW |
| Without a picture, I may be completely wrong, but If I understand you correctly, the rivet is a shaft that the star type wheel spins on; much like a latch on a car door lock. All the peen does is retain it in place, and doesn't experience much/any force laterally.
If the pivot is an alloy, it could also be worn along its length, exacerbating the problem. So why not replace it with a steel shaft? A bolt with a plain shaft for example? Perhaps just grind the peened head off, and push it through/out. Use a suitable steel rod long enough to peen over. Or use a plain shank bolt and nut. Or instead of peening, drill sideways through the end and retain with wire or thin split pin. Or ignore completely, if I've completely misunderstood. 😄😄 |
| anamnesis |
| Guy I have exactly the same issue and am interested in an informed answer as I don't want to irretrievably damage my rivets either! |
| Bill Bretherton |
| Picture Bill/Guy? What diameter is the rivet? If large enough, grind the peened head off and drill into the end, sufficient to use a very small self tapper and washer to replace rhe 'peen'? |
| anamnesis |
| Anam,I think you have understood it correctly, but it does take quite a radial load. Those frog bonnets are heavy! I guess the axial load is fairly minimal. The ends of the "rivet" need to be pretty flush on one side the other half of the telescopic strut has to slide cleanly over the end. The other end is less critical although as the strut telescoped down it comes to rest in the space between outer wing and foot well side. A protruding end there would quickly damage paintwork and metal.
Until dismantled I can't tell if the rivet thing is stepped, or carries a collar. But the star piece that it retains must spin freely so it cannot be clamped by the rivet. Anyway I will bite the bullet, drill the end off and then work out a way of repairing it! There are alternatives. A full replacement strut is around £50. But I prefer the original look of my black painted ones. I would probably end up buying 2, which is a lot. Or, people replace them with gas struts which would be an interesting solution but again, not the look I want on this car. (I do have a scrapyard pair of tailgate struts) |
| GuyW |
| Can you not just find a suitable replacement rivet? https://www.ebay.co.uk/itm/295791449455 |
| Dave O'Neill 2 |
| "The ends of the "rivet" need to be pretty flush on one side the other half of the telescopic strut has to slide cleanly over the end. " Ah yes, I see now. I agree, I'd rather repair it than replace it too; even *if* a new strut is cheap. |
| anamnesis |
| Anam,I think you have understood it correctly, but it does take quite a radial load. Those frog bonnets are heavy! I guess the axial load is fairly minimal. The ends of the "rivet" need to be pretty flush on one side the other half of the telescopic strut has to slide cleanly over the end. The other end is less critical although as the strut telescoped down it comes to rest in the space between outer wing and foot well side. A protruding end there would quickly damage paintwork and metal.
Until dismantled I can't tell if the rivet thing is stepped, or carries a collar. But the star piece that it retains must spin freely so it cannot be clamped by the rivet. Anyway I will bite the bullet, drill the end off and then work out a way of repairing it! There are alternatives. A full replacement strut is around £50. But I prefer the original look of my black painted ones. I would probably end up buying 2, which is a lot. Or, people replace them with gas struts which would be an interesting solution but again, not the look I want on this car. (I do have a scrapyard pair of tailgate struts) The star/ double lozenge piece is the bit that rotates. In one position it allows the other part of the telescopic part to slide past. This flips the star bit round and when you close the telescope it catches somehow on one of the ears. I expected these to be badly worn, but only a bit. Most wear is between the spindle (rivet bit) and the star, where there is a lot of wobble. 
 |
| GuyW |
| Guy
I have a selection of rivets that may be of help - may need a bit of matching etc. The hollow rivets Dave has linked to are passed through and cut off to allow a small amount to be peened - if it needs to rotate you need to only have solid rivet in the bit going through or if will bind, you can use a closing punch which goes in the centre and supports the crushing so its square. If you need something special I.e not a plain rivet, can you do a sketch and I may be able to machine up one in brass, aluminium or steel. Could make two and sort Bill out as well ! 
|
| richard b |
| The ones I linked to were semi-hollow. The main shank is solid with just a hollow end for peening. You would obviously need to know how much of a solid shank is required. |
| Dave O'Neill 2 |
| Thanks both. No further investigation as I had to go to Penrith. M6 has been closed all day with 3 lanes, hundreds of wagons. I dodged through back lanes via Appleby but it's a 25 mile section from Tebay gorge to Penrith with the only diversion onto the A6, and that was as bad. 5 hours sitting in a queue with thousands of others whichever way you went. Tanker overturned so fuel spillage across both carriageways. They had the resurfacing gang out. |
| GuyW |
| The rivet thing is stepped. The fatter end goes through the stay, then the washer, then peened over tightly so the pivot is fixed and doesn't turn.This the end I drilled to get it off.
There is then a shoulder before the bit that the lozenge spins around on, held in place by a smaller washer and more peening. That is pretty worn and the lozenge flaps around in the slot and I think tilts sideways to let the telescopic chanel past, when it shouldn't! I will drill out the smaller end and see if I can put a temporary packer sleeve in there as a test. If that works I may come back to you Richard, if I may. |
| GuyW |
Two photos of the rivet. Difficult to see properly but best I could do.

 |
| Bill Bretherton |
| Before drilling put the smaller rivet I took the age old fix it path of beating it with a hammer. Also tried a sort of bull nosed punch that was my father on law's during the war. It will have been to Murmansk and back a few times North Atlantic convoy escorts). No luck. I thought that might tighten the rivet but it didn't. There must be another step and probably wear on the back of that washer so the lozenge still wobbles. |
| GuyW |
| Dave, Sorry I wasnt disagreeing- just probably pointing out the obvious! Guy as its a one off and not production line how about instead of riveting - drill and tap the main stud and fit a in effect a washer with a machine screw attached ? Male / female joiner. That would avoid trying to ensure the material was a suitable grade for easy riveting! If you can either post a sketch or mail me I can have a look. |
| richard b |
| Really need some dimensions of the part to make a good judgement but I wonder if sleeve nuts or sex bolts might do the job, with the male screw being a countersunk to keep the head profile low. |
| David Billington |
| I will take do a sketch and take some measurements. Probably clearer than an out of focus photo! |
| GuyW |
| Guy I think I might understand it now! Does the "lozenge" thing needs to be held snug on the rivet to avoid lateral play which would impede its correct action? |
| Bill Bretherton |
| Yes I think so. But it still needs to turn. It's difficult to tell exactly how it works. I think on one upwards pass of the telescopic bit the lozenge has it's long axis aligned with the Chanel by the top part of the stay as it goes up.. Then as you lower it the lozenge should rotate and an edge of the stay catches in The V notch formed by two of the star 'arms'. That stops it going down. The next lift turns the star again so this time it will lower.
I think the wear on mine means that the edge of the upper part misses the V notch of the star part as it flaps about too much and it then doesn't lock. |
| GuyW |
| So the wear is either in the rivet or the star/ lozenge piece or a bit of both. If the star's centre is worn oval I guess that's more of a problem than if it's the rivet with more wear. |
| Bill Bretherton |
| On mine there is relatively little side to side (radial) slack between the star and the rivet. But there is axial slack. I think caused by wear of the inner hidden face of the smaller washer. This is allowing the star to tilt on its axis quite a lot. Generally too much looseness there. I will get a better idea tomorrow |
| GuyW |
| Following this with interest but not sure I understand the problem. Sounds to me like the "lozenge" device needs to be drilled through and bushed, besides a new rivet. BTW you can buy oilite bushes any size you like online for very little. I got a custom made one a few years ago for Mrs GBs kitchen mixer. Or perhaps I'm drivelling, it's not unusual. |
| Greybeard |
| GreyB, yes something like that. This thread has, as they do, evolved a bit. I started out seeking advice on how to R & R those small peened over rivet things. I thought there might be a cunning plan method that proper engineers would know. I have drilled them off then silver soldered to re attach. Doesn't work with plastic items! Maybe drilling a thin pilot hole down the centre would re-instate the rivet action? Anyway, beyond that now that I can see where the wear is. |
| GuyW |
| Richard No worries. I think I misunderstood your post. |
| Dave O'Neill 2 |
| These are the relevant bits of the sliding telescope stay. The double ended rivet thing, now a bit mangled, goes through a locating hole in the other sliding rail of the stay ( not shown), and was fastened tightly with the big washer on the outside as in Bill's photo earlier.
The fat collar, actually all one piece holds the star thing out in line with the L shaped piece on the stay, so they interact. The star bit then has a recess taking a washer so that when that end of the rivet is peened over it is flush so it doesn't catch. The star is wobbly on the rivet, mostly I think wear of the back of the small washer so that end of the rivet wasn't holding it . Then also some wear between the star and the rivet (pivot) 
 |
| GuyW |
| There doesn't look to be significant ovality in both the star and the smaller washer. Might a thin shim help to compensate for washer wear? I realise there's still the problem of securely re-fitting the rivet/ pivot. |
| Bill Bretherton |
| You are right Bill. If there is wear, it's all pretty even!
First image shows how the star thing is turned by the L shaped piece. That was worn and I have added a bit of weld on the end. Alternate turns of the star should get it to catch and release in the cut out of the top half of the stay Second photo shows dimensions, or my attempts at least! The bit marked C is what the star rotates on. The hole in the star measures 0.264 ( no ovality) and the shoulder it goes on to 0.258 so only 0.006 there. With a bit of grease I wouldn't think that too bad at all! But the small washer is 0.3 and the recess in the star is 0.62. I think that is too much but could be easily corrected with shim or a new fatter washer. None of these clearance need to be too tight though. The star needs to spin pretty freely to work properly. 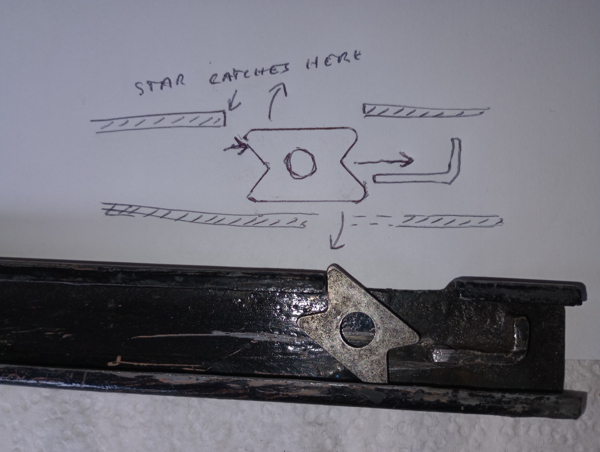
 |
| GuyW |
| David B, what are 'sex bolts'? 😯 |
| Jeremy MkIII |
| Two pieces, male and female. 😉. Amazing these days they can be called that without somone being 'offended'. 🤣🤣 Also called 'female screws'. Just make sure that's not reversed, then someone might be offended. 🤣🤣🤣🤣. Or, 'Male Female Screw'. Just rearrange to make it more interesting. 🤣🤣🤣. 
|
| anamnesis |
| Haha thanks Anam, 😆 Similar non intended faux pas - been in hospital and managed to leave a shoe there (don't ask). Went to collect it yesterday and asked for 'a black, man's shoe' - the Nurse looked askance so changed it to 'a man's black shoe'. Reminds me of eats, shoots and leaves or eats shoots and leaves - all dependent on the comma 🙂 |
| Jeremy MkIII |
| Guy, Can you do a cross section sketch of the bits assembled including the stay and indicating which end is riveted. I had thought this was a headed rivet or a shouldered rivet, but a bit more complicated. Anam, A more appropriate image attached, you never know who might be viewing the post. 
|
| David Billington |
| Lol David. Yep, these days, one must 'panda' to the woke. 🤣🤣 And some people now, just don't have any 'sole' Jeremy. 😉. |
| anamnesis |
| Ha, fortunately I now have two again, Anam. |
| Jeremy MkIII |
| Guy, I forgot about them until just now but I have some 6mm soft black iron rivets I got for repairing garden tools. They're easy to cut to length and peen over with a punch and light hammer. Happy to send you a few to play with if that helps. 
|
| Greybeard |
| Thanks for that offer Rob but I don't think I need those.
You can tell I am not an engineer! I should probably never have called this a rivet. It is essentially an axle that the star piece turns on. There is a fatter piece, which could just as well be a tight fitting collar, which holds the star the required clearance from one piece of the telescopic stay. The star is held on by a washer and the 'axle' is stepped in at this point so that the washer doesnt clamp against the star and stop it spinning. The reason I was calling this a rivet is because the ends (both) are peened over to hold it all together. I think this is a case of cutting costs during manufacture. It could be done with an axle, collar washers, female threads and countersunk male screws. Expensive to make, and slow and fiddly to assemble. Or machine the 'axle' on an automated lathe, pop the bits together and whop it in a stamping machine to peen over the ends. Likely outsourced from a small back street machine shop of which there were thousands that supported the British car industry at the time. |
| GuyW |
This thread was discussed between 12/04/2024 and 14/04/2024
MG Midget and Sprite Technical index
This thread is from the archives. Join the live MG Midget and Sprite Technical BBS now