MG-Cars.info
MG MG Y Type pedal box reassembling BBS discussion at MG-Cars.info

MG-Cars.info
Welcome to our Site for MG, Triumph and Austin-Healey Car Information.
Recommendations
Parts
MG parts spares and accessories are available for MG T Series (TA, MG TB, MG TC, MG TD, MG TF), Magnette, MGA, Twin cam, MGB, MGBGT, MGC, MGC GT, MG Midget, Sprite and other MG models from British car spares company LBCarCo.
MG MG Y Type - pedal box reassembling
| Hi the reassembling of MG YA 1675 going on next step is the pedal box today i have tested to insert the shaft through the chassis works perfect , no play the brake master cylinder ist cleaned and all rubbers are new so i want to reassemble the box tomorrow what is the best way to do it, in what position should the brake pedal be and the clutch pedal too the brake switch, insert before all other parts? have read this here before https://www.mgccyregister.co.uk/brake-and-clutch-pedal-box/ |
| FT Franz |
| I would check the condition of the shaft and chassis bushes carefully Franz. Mine were awful and needed replacing. If you do this I would recommend fitting the modified shaft available from the usual suppliers which can have grease pumped through it for lubrication. It is costly but worth the money. As for the assembly order I took notes and photos on removal but still got it wrong. Trial and error is necessary especially if you fit the spacers to eliminate any side play and avoid the interference between the brake and clutch pedals. The TUV won't like them both moving when only one is pressed. This is arguably the worst job on the car. It is certainly the most fiddly and uncomfortable. It can be improved a little by fitting a hydraulic brake light switch to replace the unreliable and difficult to adjust mechanical item.
regards Ian |
| ian thomson |
| really no play, so i can fit all without new bushes. have also made a lot of picture, but it was so dirty that you can t see anything found the part for hydraulic switch but will see how the old one fit here a link for a easy asembling hydraulik switch https://ccparts.nl/product/stoplight-switch-kit-7-16-20/?add-to-cart=23540 there are only a few pictures on the web I have already published over 600 |
| FT Franz |
| is it possible to make a grease nipple in the old shaft ? I would have to make the spiral with a metal file would not have to walk the whole length as with ntg better than what it is now grease nipple left or right side in driving direction ? |
| FT Franz |
| Franz The grease nipple should be on the right hand side opf the chassis. I attach a photo of how I fitted the stop switch. rgds, Anton 
|
| Anton Piller |
| Franz & Anton, Have you viewed the Pedal Shaft modification pages on T Talk website http://www.ttalk.info/PedalShaftRHD.html or http://www.ttalk.info/PedalShaftDelk.htm Stuart |
| Stuart Duncan |
| the construction is different with ya,
the brake pedal is located outside of the chassis and transmits its force via the toothed shaft to another part, which in turn sits on a gear and presses the lever of the main brake cylinder, so it is firmly connected, the lubrication should be in the chassis frame, if you look at the shaft at ntg you can see the difference, only the clutch pedal slides on the shaft. so i will order two long 3,2 mm hss drills to make the hole in the middle, have to see if i have the tap to make the grease nipple thread. the spiral grove in the chassis section i will make with a metalfile better a bad grove as no grove better a little bit grease as no grease there ??? the 7:16-20 dual brass union i don t get anywhere in the neatherland it is so expensive ;-( it should be possible to make a break stop swith in the banjo bolt something like this here https://ccparts.nl/product/banjo-bolt-1-2-20unf-d15l30-hex21-id1-8-27npt/ but what is the thread size there? where can i find the thread size of all screws in the car, in the manual not all are there also ntg has not thread size... or take this here, in the correct size https://ccparts.nl/product/banjo-bolt-3-8-24-d10l31-hex14/ or take the original banjo and make a thread in the head ???? |
| FT Franz |
| Franz I will admit I haven't done any work on the YT's pedals as they have little sideways movement. I did however do the modification on my TD's pedal shaft, to ensure I do not need to touch it again. I should organise and get an end of shaft cover from Paul. All the best with your restoration, you are putting alot of work into it. cheers Stuart |
| Stuart Duncan |
| took me 2 hours but happy with the solution the clut pedal works perfect and if it is damaged i could do the same there some money saved for other things ;-) you need something printed in ABS ? ask me or small parts in resin 
 |
| FT Franz |
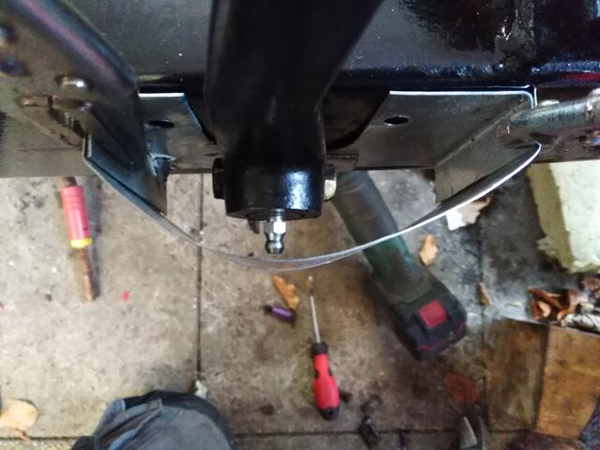
| here a picture with the working grease nipple i will see how it works when the car is back on the roaf again |
| FT Franz |
| Franz Do you have the end cover for the grease nipple? Consider buying a kit from https://www.mg-cars.org.uk/imgytr/stores/yzpublications.shtml#MGYT Paul |
| Paul Barrow |
| thx for the advice
i have weld my rusty part ;-) but i also have two 3d printers ( FDM + SLA Resin ) in my garage and i learned freecad in the last years so i have designed some parts and printed them cjr3 case for my TA, so i have a modern electronic in an original like case some individual spark plug holders a MG ring for the finger in Resin designed a holder for the rear of the rear leaf spring i think most cars have a lot of rust there i cut both away and weld this new one in there fits perfect the second one doesn t look so bar, but after cutting it away i was happy haven t done it, much more rust as could be seen before, it was not expensive, could sell some for about 30 Euro per part (perhaps) i write a story about hte car ins the mgexp phorum, was there before i got the YA and i can upload 4 pictues there, now 640 pictures ! 
|
| FT Franz |
| Hi All, I myself would not grease the shaft but use an oil gun with care, with that long shaft and the fact it won't be done that often there is a good chance of the grease solidfying and once that happens you will not move it. If oil is good enough for the steering rack im sure it is for c/pedal John YB0362 |
| JC Jebb |
| you mean this here never opend this building in 48 ?! |
| FT Franz |
| Hi Franz, Don't understand your last posting ?? John YB0362 |
| JC Jebb |
| i don t understand it too ?????
it was a horrible job today the pedal box next time i would paint the pedal box inside in silver so you have more light in black you see nearly nothing but step by step make it with the body on the chassis i don t want to do it again 1.take the 3 screws you need to fix the master cylinder and put it through the hole, the head should be inside the box 2. take the master break cylinder and fix it with the screws, tricky 3. take the lever with the spring and hold it in the inside of the box in correct postion 4. hang the front of the spring to his position in the front of the box 5. look to the picture, the bolt must fix the lever to the fork, i had big problems to hit the hole of the lever, after 10 minutes of frustration i took a screew and hit the hole from the other side, now the lever is in the correct position and it was easy to hit the hole with the bolt 6. got the advice to make a grove to the bolt, but it was easy for me to fix the security bolt, so i haven t done it. 7 take the shaft and put the lever on it, but don t pull it in total only a little bit 8, take the clut pedal and put it on the shaft too 9. pull the shaft in total 10. you should have a little play ( 1,5mm) otherwise you have to take a washer 11. secure the shaftwith the spring ring step by step for me if i have to do it in future again, or other MG freaks who have to do this job 15 MINUTES IF YOU HAVE DONE IT 3 TIMES; THE FIRST TIME AND YOU DON T KNOW WHAT STEPS TO DO 1 or 2 HOURS AND A LOT OF FRUSTRATION WITH THE BODY ON THE CHASSIS YOU NEED 4 HANDS AND A LIFT or a lot of nerves and luck now one part is missing again the stop light switch is cleaned and looks perfect, so i will fit it again, but where is this little spring 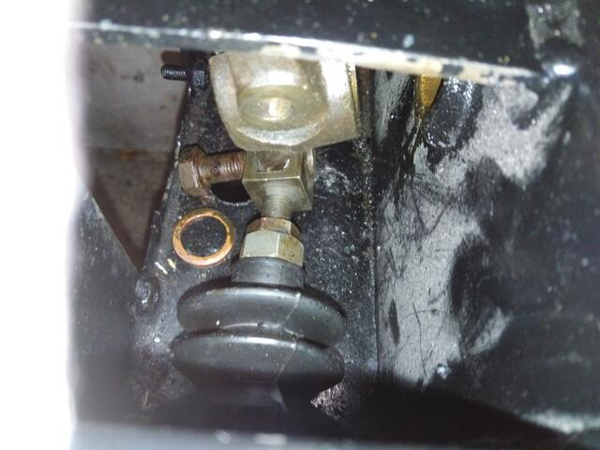
 |
| FT Franz |
| Definitely a job for small fingers! I hated when I had to work in it! Paul |
| Paul Barrow |
| i dont find this small spring for the break light switch
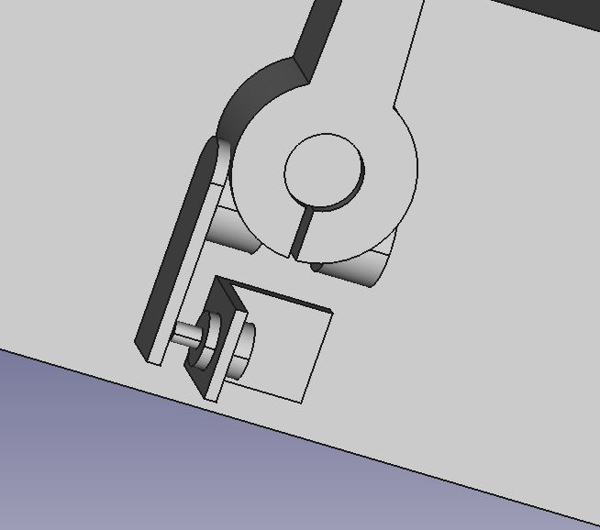
i had it in my fingers some weeks ago but where is it so i think to change to one easyer way i will fit the old cleaned switch inside at the correct position but the switch will sit outside i found this solution, i like it i made a fast and dirty 3d drawing i want to take something like this here https://www.ebay.de/itm/Universal-Bremslicht-Taster-Offner-M10-Kontakt-Schalter-KFZ-LKW-PKW-Turkontakt/133111341308?hash=item1efe0de0fc:g:sLQAAOSwdtBdKgKf will cost only some euros and can be changed easy if damaged i will use the old screw holes in the chassis and make a new box for all will use spring steel for the switcher the hydraulik switch will cost 100 euro and will be under the car, more difficult to reach if problems. with this solution you spent less money you can check it easyly you get a new box , the old one is mostly damaged you can find and use other switches, only change the holder ???? 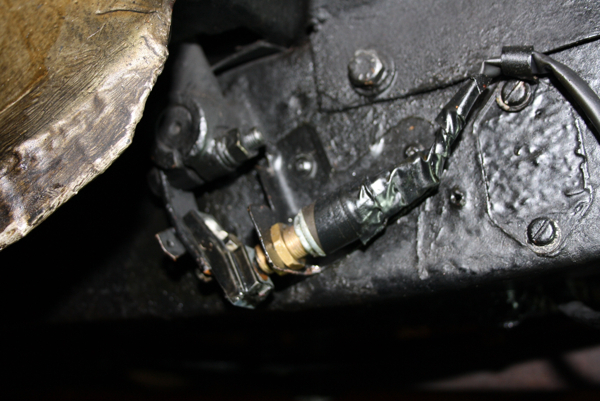
 |
| FT Franz |
| the first solution
1 hour of thinking and working how can the new universal braking switch look like the holding plate will use the old holes in the chassis and is zink plated, so all can be changed without problems to original i will print the cover box in black ABS so rust will never be a problem inn future, it will be closed on the bottom here some pictures from the first prototyp Have to order the switch and then finish the job when the body is back on the chassis so that i can see where the wire can be run, have a good idea for this but will see if it will go I will use spring steel to make the stylus you like it? 
 |
| FT Franz |
| here a picture how it looks like 2 screws to fix the cover, so really easy to look to the switch if something wrong 
|
| FT Franz |
| i found a switch from an old projekt only for 1 wire so i have to use a relay but easy build so no problems in future so i will take a relay with a fuse inside i think a really good solution i tested the switch in position and it works perfect so i don t have to buy one the battery box is more then high enough so a lot of room for modern electric stuff on the floor of the box or inside on the wall of the box somewhere i can reach the parts easyly have to think about it 
|
| FT Franz |
| when i cleaned the rear brake parts i found a 4 way union there, one hole closed with a screw taken of the screw and found 1 3/8 bsf thread with some brass out the garage i made a adapter for a hydraulic brake light switch M10x1 is really cheap so i will buy it and use it in this position i can take the original wire that goes to the switch and not to the break light 
 |
| FT Franz |
| the cable for the clutch is ok but the rod is the better solution one owner before has made a rod for the top i made one for the bottom today was easy to make it and works perfect so here 2 solutions i can change and for the brake swith 3 solutions and getting better with my lathe with every part i make by myself 
 |
| FT Franz |
| Nice work. Paul |
| Paul Barrow |
| perhaps someone needs some fine fule line holders ;-) have made a 3d drawing so you can order it as a laser cutter service my new one are from polished stainless steel here are some more pictues https://www.mgexp.com/forum/t-series-and-prewar-forum.46/mg-ya-no-1675-from-1948.4022768.4259298/page-35#msg-4259298 
 |
| FT Franz |
This thread was discussed between 20/11/2020 and 09/12/2020
MG MG Y Type index
This thread is from the archives. Join the live MG MG Y Type BBS now