MG-Cars.info
MG MG Y Type YA radiator support. BBS discussion at MG-Cars.info

MG-Cars.info
Welcome to our Site for MG, Triumph and Austin-Healey Car Information.
Recommendations
Parts
MG parts spares and accessories are available for MG T Series (TA, MG TB, MG TC, MG TD, MG TF), Magnette, MGA, Twin cam, MGB, MGBGT, MGC, MGC GT, MG Midget, Sprite and other MG models from British car spares company LBCarCo.
MG MG Y Type - YA radiator support.
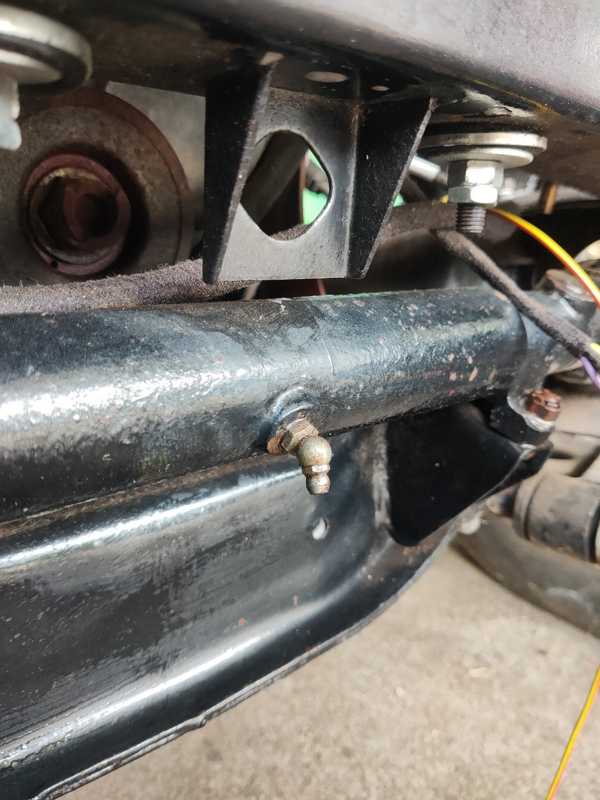
Before I do final assembly stuff, may I check the collective wisdom: the pic shows the rad. support bracket with the larger flange facing forward, which I've read is correct. But it doesn't "look right" with the guide bracket for the starting handle facing backwards like that. I know the orientation affects radiator and bonnet fitting, so is there a definitive view out there? Thanks all. John.
|
| J P Hall |
| I know it looks backwards ... but you are 100% correct. Proceed with confidence! Paul |
| Paul Barrow |
| Hi John,
Am I glad you raise this. I am near to refitting my radiator too. But my support channel seems to be a replacement custom one. It isn't cranked, so I am fore-warned I guess that I may be looking at shimming under the radiator to get good alignment of the bonnet to the body. There is a packing piece under each end of the channel so maybe it's already done. But as to your question, the file attached is just extracts from LTBYs and the workshop manual. The pic from LTBYs and the text clearly want us to put the wider upstanding flange to the rear. And the crank bracket seems to have its "good" side to the front. Now that is seemingly not what the exploded chassis diagram from the workshop manual would have us believe. maybe, it makes no difference. I look forward to comments from people with much more knowledge and experience than I have. Funny how these little details take up so much of our time. regards KGM |
| K G Mills |
| hi i can go to my garage to look how i have done it i can test it with the starting handle if it is correct i have made 1500 pictures but not enough we see my car was asolutly original 
 |
| FT Franz |
| SO - LTBYs says "tall flange to the rear"; Tony Slattery has advised the same after looking at 3 Ys; the picture in the WSM shows the crank-handle bracket facing backwards (as in my photo); and Paul suggests my configuration is correct. I love this hobby.
Franz - it would be great if you could put up a photo/information showing your original setup - although as you can see, there are differing opinions. This reminds me of my recent question about the thread on the Jackall Tube Nuts - I have had no success from any quarter in getting a definitive answer. Not even from the UK supplier. I'm nervous about final assembly of bonnet etc. until I decide whether to "leave well alone", or to flip my rad. bracket around the other way. Sorry Keith! Let's see if any more views are forthcoming - especially from recent restorers like Chris Pick, Neil Wakeman et al. All comments and help are appreciated in these difficult times. John. |
| J P Hall |
| Hi John,
can I ask a favour? The crank in this cross member effectively raises the radiator. As I said, it seem my channel is not original and is straight. Can you tell me the offset in the crank of your radiator support so I can check if the end packers under my channel are about the right thickness. Also are the holes for the radiator attachment studs and for the bolts at the ends that go into the chassis, in a straight line? regards Kevin Mills (It doesn't surprise me my channel is not kosher, the front of the chassis was way out of whack, so it seems my YT had an altercation with something fairly substantial at sometime.) |
| K G Mills |
| Hi again John,
Can I share this piece of trivia. While I don't know much about MG's, some stuff I do recall from my studies 60 years ago. I note your double nut locking has the thinner jam nut on top. In a relatively stiff joint, all this you probably know, the jam nut should go on first, to a bedding torque only, then the thicker main nut on last, . This is tightened down while holding the jam nut against rotation. But with a long bolt or compressible joint as we have here, that procedure can actually strip the thread in the thinner jam nut. So what you have is correct. Initially jam nuts were thin, before my time even, rather impractically as not many thin spanners exist in tool kits. So they were thickened up to the sort of half size nut we know now. And two of these nuts were the usual, rather than having the two sizes. The file shows the nuts off my radiator, 2 normal and "two locking" (using WSM page J-1 words). The latter are the old "thin" type. It also shows a pic from the WSM where , with a sympathetic interpretation, the lock nut (thinner one) was below the main load carrying nut . As I say, this is now not regarded as good practice. Hope this is not just boring. regards KGM |
| K G Mills |
| Here is a photo of my YT's radiator support bracket through the grill crank handle hole. The distance also includes the thickness of the chassis channel lip. (the steel piece is wedged under the upper chassis lips). My bracket is orientated with the crank handle bracket at the rear like in John's photo in his first post. cheers Stuart 
|
| Stuart Duncan |
| Hi Kevin - no problem, I'll post that info first thing tomorrow. Your experience on the locknut issue will interest a lot of folks, thank you. Stuart, is the YT configuration of rad. support the same as YA? Looking forward to findings from Franz. John. |
| J P Hall |
| Hi John and Stuart.
well this is a good news , bad news, thank goodness story. Hopefully the pictures tells the story. I replicated your idea Stuart, (Thanks for that ) and the rise from the end packers is very nearly the same as you show for the crank. That's the good bit. The bad bit, the crank guide bracket is too high, and I would not be able to get the crank handle through the guide on the bumper, this guide and into the dog on the engine. The thank goodness bit... Well just think what I would feel like if I had the bonnet fitted and all before I discovered this. Next job, shift the hole. regards Kevin M |
| K G Mills |
| Hi John & Kevin YA & YT are I believe the same mechanically. I will take a photo of the TD bracket this morning and post it when I come home from my work shed for lunch. Stuart |
| Stuart Duncan |
| Kevin - measuring the same way, I get 15mm as near as makes no difference. Hope this helps. John. |
| J P Hall |
| TD radiator support is completely different - channel is inverted with flat on top and 2 flanges with crank holes below. No way they could be confused. Stuart |
| Stuart Duncan |
| Hello John, yes it helps. But can you tell me if the mounting holes at the ends of the support channel are a)-- elongated to allow adjustment, and b) - centrally placed and in line with the holes for the radiator retaining bolts. thanks Kevin M |
| K G Mills |
| Kevin - I tried to download a photo this morning, but since the dreaded NBN ... you know the rest. So just verbally for now: the studs at the base of the radiator (actually on the casing at the base of the radiator) sit in a round hole, not elongated; .when I string-line across from chassis rail to chassis rail, the holes are all in a straight line. Hope this helps. John. |
| J P Hall |
| Hello John,
thanks for that. However, I am still unsure which way is up. The holes for the studs at the bottom of the radiator (as you correctly point out) fixed to the cradle for the radiator "film". (Strange word that but that's what the WWSM calls it.), are certainly just round. But it's the holes for the bolts that hold the support channel to the chassis where I seem to have some confusion. The diagram in the WSM may? have a hole elongated along the length of the channel, though in the image in LTBYs there doesn't seem be any slotting under the bolt heads. And the article in Hints and Tips, "Bonnet and grill alignment" by Tony Slattery says "the mounting panel under the radiator is free to move on the chassis,-left and right, forwards and backwards." Which implies some clearances. When I set up a laser reference as best I can, it seems the line through the mounting holes in the chassis is not parallel to the scuttle. so some twisting could be needed. My grill seems a snug fit (if it goes at all) between the sides of the front valance. Looks like a protracted session of fitting re-fitting will be needed. regards Kevin M |
| K G Mills |
| Franz Tenbrock - sorry, looking again I see that your first photo does show the wider flange of the support bracket to the front (like my installation).
Kevin - yes, as Tony Slattery stated, the holes in the support channel where it bolts to chassis are definitely elongated - in my case the hole in the chassis leg is elongated to 13mm and the hole in the channel sitting above it is elongated to 15mm. The orientation of the elongated holes is transverse (L to R) in both cases. It's an odd setup, but I guess it works. John. |
| J P Hall |
| Hi All, I can also confirm that the orientation as in the picture in the first post is correct. It needs to be this way as the (vertical) flanges across the support are different heights. The taller flange needs to go to the front as it interferes with the radiator drain tap if it goes to the rear. The holes that attach the support to the chassis on mine are elongated ... but I don't think that this is original. I does allow for some wiggle room to get the radiator aligned properly before the radiator support bolts are fully tightened. Hope this helps. Ewan |
| E.J. Ward |
| Ewan - ..." the taller flange needs to go to the front as it interferes with the radiator drain tap if it goes to the rear" - well why the b..... h... didn't I realise that?! I crawled under, and it appears you're quite right. One for the archives! Thank you. John. |
| J P Hall |
| John,
The radiator support bracket on YB0952 is oriented as in your original photo. The radiator mounting hole in the support bracket is assymetrical front to back. The mounting holes of my bracket, which I believe to be original and unmolested, are perfectly round. The elongated holes others describe were probably done by some later ham-fisted w*nker owner to "make it fit." If the bracket is installed incorrectly, the distance between the chrome raditor grille assembly and the body does not fit the length of the hood (excuse me, bonnet). The only way an even/equal front-to-back gap can only be obtained is with the radiator bracket installed as shown originally. Rocky |
| Rodney C "Rocky" von Dullen |
| Thanks Rocky - your comments appreciated. I shall, as Paul suggests, proceed with confidence. Paul, I hope to see you in Queensland in June? John. |
| J P Hall |
| Hi All,
with such contradictory but well documented evidence and observations, (and since I have a custom made support bracket anyway), I am glad to be out of this. It seems to me that there must be different versions of the bracket mounting holes, and possibly an evolution of just what was original too. So, John, we need to go with what fits., and a trial and re-try operation is next for me. It is likely, given the apparent damage history to my YT, that the scuttle is not exactly where it ought to be as well. I hope I'll get a good bonnet(hood) fit up all round. good luck. regards KGM BTW, I have had to get a replacement chassis, it was cleaned up and sand blasted. But for the life of me, I could not find the chassis number on the left dumb iron. |
| K G Mills |
| Roger that, Keith - I guess you know there's a Y chassis for $100 on the MG Buy Swap Sell site just now? John. |
| J P Hall |
| Kieth Look on the right dumb iron then add 251 to that number. The result will be CLOSE but not 100% on the Left number but it will give you a clue as to the area of numbers you are seeking to see and might help. Paul |
| Paul Barrow |
This thread was discussed between 20/01/2022 and 02/02/2022
MG MG Y Type index
This thread is from the archives. Join the live MG MG Y Type BBS now