MG-Cars.info
MG TD TF 1500 Revived From Archives-Seat Belts 2010 BBS discussion at MG-Cars.info

MG-Cars.info
Welcome to our Site for MG, Triumph and Austin-Healey Car Information.
Recommendations
Parts
MG parts spares and accessories are available for MG T Series (TA, MG TB, MG TC, MG TD, MG TF), Magnette, MGA, Twin cam, MGB, MGBGT, MGC, MGC GT, MG Midget, Sprite and other MG models from British car spares company LBCarCo.
MG TD TF 1500 - Revived From Archives-Seat Belts 2010
Posted back in 2010, Larry Shore of Mass, posted this photo of his seat belt anchor point, thanks Larry. Why wouldn't the bolt, after enlarging the hole, in the circle be a good solid anchor point. Using an angle bracket inside the car and a grade 8 bolt, it should make a very strong connection. Many seat belts come with the angle bracket in the set. Comments? PJ

|
| Paul161 |
| Just curious as to what car this is in the image? |
| Geoffrey M Baker |
| Geoffery, I'm not positive, but I think Larrys car is a TD. TD, TF, all the same. I seem to remember this post as it was around the time I sent my chassis out for sand blasting and was curious about welding those brackets on, I decided not to. PJ |
| Paul161 |
| Don't really understand your question??? |
| Steve Wincze |
| Paul, could be, but I have a TD and just can't picture the car at that angle at all. Rear drive shaft tunnel yes, but that welded tubular section is confusing me. I'll have to get under and look :) I would agree, that seems a good point as it ties to the tubular crossmember. Any seat belt point should tie to a cross member at the least. I think too many are just bolted to the floorplates or even the plywood and would never hold in an accident. |
| Geoffrey M Baker |
Perhaps these will help

|
| MG LaVerne |
Here ya go

|
| MG LaVerne |
| It looks like a plate hoop welded in to take the seat belt loads, that puny 5/16" BSF would not take it. The belt bolts are up high on the hoop and look as though they foul the propshaft on full bump. Ray TF 2884 |
| Ray Lee |
| They foul partly because the weld fillet at the bottom is much too thick and the plates are not hard against the propshaft tunnel sides. Dave H |
| Dave Hill |
| PJ, here is an upper view of my TD chassis, will this help to make your point? I was kind of looking for attachment points myself for seat belts. Bill TD24570 
|
| Bill Brown |
| Having seen first hand how far seat belts stretch I am not sure they will help. Even with them on you will still hit the wheel and headbut the screen/dash. Ray |
| Ray Lee |
| PJ, another view. Bill TD24570 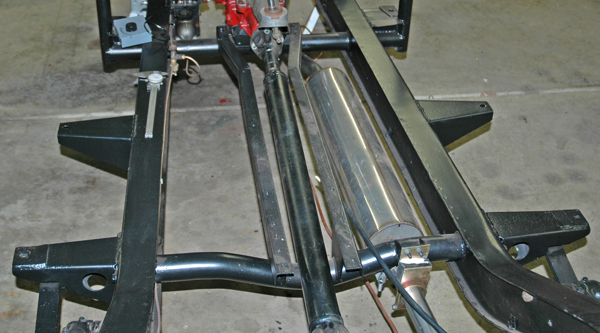
|
| Bill Brown |
Paul, I use that point as the securing spot for my inside belt mount. The bolts that I use a standard seat belt mounting hardware. Obviously, this type of belt configuration is no where near the equivalent of a modern system. But, they work quite well to keep me, and a passenger, in place during spirited maneuvering and quick (not violent) stops. Far better than nothing, IMHO. Bud

|
| Bud Krueger |
| Thanks Bud, I glad someone understands what 'm getting at. Without a roll bar and 3 or 4 point belt connections, the single lap belt offers minimal protection, but it should keep one from sliding around the seat while making quick turns. Psychologically, it's just a little more secure feeling. PJ |
| Paul161 |
| I plan on installing a 3 point belt system in my car like Horst Schach shows in his TD restoration manual. Anyone have experience with that system. The attachment points of the inside brackets seem to be the same location as the one above but welded vs bolted. Tim TD12524 |
| TW Burchfield |
| FYI, I built a 3 point system that mounted to heavy duty frame points (tube and square tube steel) on a removeable rollbar. You can find it in the archives. |
| Geoffrey M Baker |
| Search for posts under my name in the Archive, I provided full details on my solution to this problem on my TF. Same should apply to a TD, configuration is tight however achievable. Graeme |
| G Evans |
| The picture I posted was part of the 3-point belt installation done by my dad when restoring the TD. It was inspired by Horst Schach and the full chapter in his Restoration Manual devoted to this subject. Note that Horst describes bending the fabricated center seat belt anchor bracket (essentially making an "L" bracket), so it mounts flush with the existing vertical plate . The welder who did the work on our TD did NOT bend the bracket, but welded it inboard of the existing vertical plate. To further encroach on the drive shaft, a nut was welded inboard on the new bracket. You can get a glimpse of the nut just to the right of the drive shaft in the first posting on this thread. DO NOT FOLLOW THE INSTALLATION PROCEDURE THAT WAS DONE ON MY TD. IF YOU WANT TO DO SOMETHING SIMILAR, FOLLOW THE DIRECTIONS THAT HORST DESCRIBES. Shortly after I became the owner of the TD, I discovered that, going over significant bumps in the road, the drive shaft would contact the welded nuts. Let's just say it was startling! I corrected the problem as follows: - Ground off the two nuts - File the hole in the bracket so that it would accept the square portion below the head of a 1/2" Grade 8 carriage bolt - Used a large adjustable wrench to bend the top portion of the bracket outward (first bend to the outside, second bend to restore vertical). Final placement of the top of the bracket was flush with the tunnel cover. - Placed the Grade 8 bolt with head inboard See picture (attached) From this point the rest of the installation proceeds as expected. I've had this reworked configuration for a number of years and it has performed well. The drive shaft no longer contacts seat belt mounting hardware. I've got more pictures and can provide additional detail, if of interest. Larry 
|
| Larry Shoer |
| I Installed "Racing" seat belts in my TD back in 1966 when I first got it. Looking back my initial installation was useless. I simply bolted them to the plywood floorboards. During the rebuild I wanted to keep the belts, but improve the installation. Unlike the fastening Bud shows my belts are secured by Large Eyelets which have large flat washers to spread the force out and Large 7/16 bolts. Buds anchor points would be too close to the drive shaft tunnel and the outer edge of the body for me. I have used the washers on the top, they normally go on the bottom. The brackets I have made will take care of the bottom, the washers stop the floorboards from compressing around the hole since the shoulder on the eyelets are not that large. I fabricated brackets from 1/4" flat stock. These run parallel to the areas which Bud used but moved inward and run all the way up the Tie Bar. Left most frame; One of the fabricated brackets. Center top; eyelets installed. Center bottom (mentally rotate 1/4 turn clockwise) Bracket running up the tie bar and under the floorboard. Arrow shows mounting bolt (without securing nuts and lock washers.) Rightmost Arrow shows mounting bolt of eyelet. Ray; it is my understanding that the initial reason for seat belts, the lap type, was to keep the occupant inside the car. Data had shown the it was safer than when the occupant was thrown from the vehicle. Jim B. 
|
| Jim B in NJ |
| Larry, thanks for the confirmation on Horst's method. It looked like a solid installation to me but experience beats text book knowledge every time. Tim TD12524 |
| TW Burchfield |
| Here is my installation. TF Dave 
|
| D Moore |
This thread was discussed between 25/08/2015 and 28/08/2015
MG TD TF 1500 index
This thread is from the archives. Join the live MG TD TF 1500 BBS now