MG-Cars.info
MG TD TF 1500 TD Door & Frame Fixings BBS discussion at MG-Cars.info

MG-Cars.info
Welcome to our Site for MG, Triumph and Austin-Healey Car Information.
Recommendations
Parts
MG parts spares and accessories are available for MG T Series (TA, MG TB, MG TC, MG TD, MG TF), Magnette, MGA, Twin cam, MGB, MGBGT, MGC, MGC GT, MG Midget, Sprite and other MG models from British car spares company LBCarCo.
MG TD TF 1500 - TD Door & Frame Fixings
| Had a look in the archive & on Dave Braun's site but couldn't find the info I need. The doors seem to have a plate on the stile with a couple of captive nuts which seems easy enough to make. Does anyone have detailed measurements of these plates & the original fixings? Mine are missing. Also on the tub door frame timber, based on photographs I've seen, there appears to be some sort of metal insert & again I have no details. Clearly the location & relationship of these plates to each other is critical as it determines the final positions of the door & frame hardware. Dave's series of pics are very helpful & show the extent of the rebate on the door stile for the metal plate. They also show what a PITA hanging TD doors will no doubt prove to be! What I want to avoid is drilling a series of holes in the wrong place & turning the new timber into Swiss cheese. The tub is on the chassis & the driver's door is ready for test fitting, (once I fit my handmade aluminium thresholds which are presently under construction) & then to ensure the desired 3/16" gap. I plan to first achieve a good door fit in the opening & then adjust the top/bottom/in/out using the turnbuckles. Next I plan to fit & adjust the hinges making sure they are in wind, fabricate & install the missing plates & then fit the original door furniture. My goal is to get to hear that solid clunk when the door shuts! TYIA. Cheers Peter TD 5801 |
| P Hehir |
| You really need to get the plates first. You want to have the latches in place when you do the body shimming and turnbuckles. Its best to be able to tweak one and then the other as you make changes. I found going back and forth the best plan of attach verses doing the shimming and then only the turnbuckles. Note you will need to temporarily shim the striker and lock (ie the thickness of your upholstery) when fitting the doors. Note there is a difference of opinion on whether hinge bending is required and it may be car dependent too. |
| Christopher Couper |
| Thanks Chris. I wanted to have everything to hand before I commenced, hence my request for info on the door & tub plates. Once I have the doors sitting nicely in the openings (without hinges & furniture) further body shimming shouldn't be required. I still feel it's best to do this prior to fitting any of the hardware. This is how carpenters hang doors, ensuring the door fits the opening first with suitable clearance (quirks) all around. All advice & suggestions appreciated however especially on the plates! Cheers Peter TD 5801 |
| P Hehir |
| Peter, Moss have the plates 401-420 & 401-430 $18.60 a side. |
| Rod Brayshaw |
| Peter, You are spot on, a real PITA. I would be very surprised if you don't have to shim the tub after hinge fitment. It is all just theory until the hinges are tightened. I found it best to fit the hinges to the tub first. Then I sat the door in the opening and measured how far the hinge protruded beyond the door frame. I then put one wood screw only per hinge into the door pillar and checked the fit. Once i was happy I put the correct metal thread screws through the pillar. This process was followed on my TF and TC. No captive nuts were used and I don't know where they are used on a TD. Given the number of times the hinges are taken on and off during this process and through the painting process etc, I think it is a good idea to use lighter gauge wood screws until almost the last time the hinges are put in place. I must admit that I did make a mistake with drilling one or two of the holes in the pillar and had to glue dowels in as a repair (swiss cheese) Not nice but not the end of the world. |
| Max Irvine |
| Thanks Rod & Max. The captive nuts are on the plates that fit into the timber lock stile on the door. Dave Braun has some good pics of these on his site. I'll check out the Moss catalogue but will probably get them from either AS or FTFU if Doug has them. I have some NOS door machine screws so I need to be sure of compatibility. I've seen a pic of the door plate but I'm still unclear on exactly what was fitted to the tub frame. Most owners these days baby the doors when closing but they need to be able to withstand the forces generated when swung shut by the poorly informed. (Not that I'll let any such within 10 feet of my car!) Screwed into timber just isn't good enough. The striker needs to be mounted securely, hence the metal plate, presumably with integral threaded nuts? Cheers Peter TD 5801 |
| P Hehir |
| Peter, the door front post and the pillar have 2 "T" nuts each fixed from the panel side to secure the plates. The plates have captive nuts that have two each for the lock and striker plate to allow minor adjustment. The other fixing holes on the striker plate and the door lock have wood screws fitted only after the fine adjustment is done. There is no way they will pull off as the "T" nuts hold the plates through the wood. Your original wood pieces should have these "T" nuts? |
| Rod Brayshaw |
Image of pillar "T" nuts

|
| Rod Brayshaw |
| Peter You are embarking on the most frustrating task in restoring a T series. Every time you believe you have the doors closing correctly it will come unstuck once you raise the car on jacks and lower it the ground or you hit a decent pothole in our first class NSW road network. These things have a wooden frame which flexes without provocation. Before you commence the task throw all thoughts of using wood screws aside.Using your hinges as a template fabricate some "nut plates" out of 10# steel and weld nuts, to match the countersunk machine screws you intend using to secure the hinges, to them. These allow the hinges to be fixed to the doors and tub using a clamping action. This also facilitates some fine adjustment at the fixing points. Compression of the door upholstery panels where the door latches are fitted is another source of frustration. I found I could insert alloy sheet packers under the latches to obtain greater latch penetration on the latch wedges. Another tool you require is a piece of rod that is long enough to pass through both the top and bottom hinge when you are mounting them. I could further reveal my experience and fixes however this post is already too long. Graeme |
| G Evans |
| That would be nice Rod however the originals are long gone & the replacements have no nuts. These timbers were replaced not long after the car came off the road in 1971 when I knew next to nothing about TD's. I think I'll have to make up a plate for the tub pillar with two captive nuts behind & routed into the face of the pillar. So the next questions are what is the size of these BSF nuts & exactly where are they located? I realize this is a cart before the horse exercise but short of removing the tub pillar I don't have any other choice. The tub is painted so I don't want to pull the pillar out. I may have to fit this plate last then have the position of the striker drive the precise location. Graeme I had planned to do exactly what you've suggested with the welded nuts & to use the rod to ensure I'm not out of wind. If you don't mind I think I'll email you with further queries as the need arises. I've fitted angle brackets & plates at each of the joints around the door openings to stiffen up the half laps. These are clear of the hidem binding line. Any pics of the tub pillar striker area would be a help as I'm not sure just what should be attached to the plate. This is gunner be a RRPITA! Cheers Peter TD 5801 |
| P Hehir |
| The hinges are fixed with nuts and bolts and a single wood screw. I know a number of owners, including myself, have tried to make "captive but plates" for the hinge bolts but have found it impossible. The holes in the wood frames exit at all sorts of angles and the spacing immediately under the hinge flaps is different from the that at the other side of the frame. Certainly needs large washers though to prevent the nuts biting into the wood and slackening. Jan T |
| J Targosz |
| See http://www.ttalk.info/Sheward.htm for some of Dave Sheward's modifications. One of them is access to the hinge hardware. Bud |
| Bud Krueger |
| One of the modifications i made was to fit a short section of 1 1/4 angle iron on the inside of the door post, and on the door frame. These are held in place by a wood screw into the door post & door frame. They are then drilled and tapped in place to match the hinge bolts and the door check fitting.. Thus replacing the inside nuts on the hinge bolts This then allows removing the hinges without removing the upholstery later. To complete the fix, the door check is also modified by replacing the pivot rivet by a 10-32 set screw so it can be removed to complete the door and hinge removal without disturbing the upholstery. This also allows the doors to be opened to 90 degrees to work on the hinges if needed by simply removing the pivot screw. ( note: be careful to keep the free end of the door check from falling inside the door!) I added a washer and spring on the door side of the check to ease the shock of opening the door fully. |
| Don Harmer |
| Some good suggestions there Don. I'll definitely use the washer & spring on the door check & will give serious consideration to the angle iron & the set screw mods. I particularly like the accessibility these afford. I also intend to have a look at Dave Sheward's modifications. If it isn't visible & makes life easier I'm all for it. Cheers Peter TD 5801 |
| P Hehir |
| Peter: The T doors are different than hanging doors in houses. You cannot deepen or change the hinge position. That is fixed. The shimming of the body is the exact method. The different shim thicknesses are what change the size of the opening. You basically torque the body until the opening is correct. Then you can use your turn buckles in order to twist the door so it lays flat against the body. Some people have found a need to bend the hinges in order to get the back of the door closer or farther way from the body. Note you DO NOT shim the hinges though. |
| Christopher Couper |
| I understand why you say that Chris but once the door & frame timbers have been renewed the fixed hinge position has been lost, though the metal edge of the door skin & tub does give some idea of the correct position. AM door & frame timbers are supplied oversize & need to be modified to suit each car. Dave Braun's experience shows just how difficult this fitting process is & how much trial fitting & modification is involved. The shimming of the body certainly does alter the door opening & I'll be relying heavily on this method, up to a point. However the door timbers themselves often need to be modified to achieve the desired quirks. As everybody agrees it's an extremely difficult & time consuming process attempting to achieve a pleasing result. Apart from the size of the opening & the size of the door (as well as the relationship of each to the other), the precise hinge location is a major problem & the position of the lock & striker is yet another. Cheers Peter TD 5801 |
| P Hehir |
| Good point about new timbers. I was not thinking in those terms. |
| Christopher Couper |
| Tried the catalogue Rod & on line but getting nothing for Moss 401 420 & 401 430. Seems like the right area but the plates aren't there. If I had some details especially the thread type, I could easily make the door plate using the lock to determine captive nut positions. I'm still confused about what screws into the 2 captive nuts buried in the tub frame pillar & whether anything else fits there apart from the striker plate. Anyone able to post any pics of the pillar around the striker area? I'm reusing the original Silent Travel hardware & have NOS screws so the correct thread is critical. TYIA. Cheers Peter TD 5801 |
| P Hehir |
| A turn buckle across the diagonal of the door will not pull the bottom corner in towards the body but it will raise it. The best way to get a good door fit is to shim the body - even if you think it doesn't need it. You can always leave them there but if you haven't put any in you can't take any out. Then fit the wooden door frame, without the metal skin, into the body. At this stage you can fettle the joints to make certain it fits flat. The metal strip / flanges can similarly can be fitted and adjusted to fit the body. I argue that if you have to twist the door to get a good fit at the bottom, front corner there will be a gap somewhere else and the twisted door will eventually creep back to its original position. When doing the fettling you can use the flanged strip under the hinges to set it. Jan T |
| J Targosz |
| Trouble is Jan I'm way, way past that. The painted tub is on the chassis & so the frame is obviously skinned. I agree that shimming the body is essential to a good fit. Not sure what you mean by "the flanged strip under the hinges"? I'm most interested in identifying the thread on the door furniture. Can anybody provide this info?? Cheers. Peter TD 5801 |
| P Hehir |
| Peter, You may be able to make a striker mounting plate that attaches to the door pillar and carries forward and also attaches to the flat steel section which is bolted to the chassis hoop. A design like that could be made to be very stiff and strong. |
| Max Irvine |
| I'll probably end up doing something like that Max as I intend to make my retro fit extremely sturdy, unlike many of the restorations I've seen here. With 3mm steel plate, some patience & my MIG anything's possible. Still need the thread info though.. I guess it could be BA or BSF. The original detail around the tub door pillar would also be a huge help. Cheers Peter TD 5801 |
| P Hehir |
| Peter, I am having a similar issue. I have just become aware that I have been installing the door latch incorrectly. I have been using only the first click. I did not realize that the hole in the striker should be the final resting place of the Latch. I have been able to get the right side door to latch. I am having issues with the left side door. I have also replaced the door pillar on the left side. I dont remember how I determined where to drill the holes for the captive nuts but they do seem to have come close to where they should be. The captive nuts I used were 10-32. The originals were 2-BA. The door pillar has a milled recess for the door striker plate attaching plate 401-420. The attaching plate has oversize holes and is attached with FH machine screws using a washer under the flat head. This allows one to move the attaching plate left and right and up and down just a bit. Perhaps 1/16" The attaching plate also has captive square nuts that allow a further 1/32 or so of movement. The door striker (401-488) is ultimately secured by two oval head wood screws. Avoid fixing these until you feel good about the fit. There is little room for error The latch has a double tapered slot. The striker must perfectly engage the slot. The door latch has some play, up and down, left and right. The striker can be adjusted to stick further out by using washers between the striker and the striker securing bracket. I believe that the rubber in the striker bracket my give some play if its not hardened. The door latch my need to be moved into the cockpit. I needed to do this on the left side. I used 3/16" worth of shims. I made mine form UHMW just because I had it. I believe one could also move the striker out towards the rear, just a bit by opening the milled relief in the door pillar with a wood chisel, just like mortising a door lock. I dont seem to have that option since I have also replaced the front Quarter panels and they lap around the door pillar to the edge of the mortise. I have just found, yesterday, that my striker, which is old and from eBay, does not fit into the double tapered slot on the new door latches. They are new, unused, and purchased from Moss 27 years ago. The striker will not go in far enough for the tong on the latch to enter the hole. I am CAREFULLY working to correct this with a file. Moral: Dryfit your parts before assembly. If I can take any pictures let me know. Most everything is apart. Like you the tub is painted and assembled and to make matters worse the upholstery is installed. Jim B |
| JA Benjamin |
| Jim this is the kind of info that I need. Any pics you can post of the two plates, (particularly the striker), the final resting place of the latch etc, in fact any pics detailing the original components & assembly method would be greatly appreciated. I have no idea what the tub plate looks like. With new wood in the doors & tub pillar I'm starting from scratch. Max Irvine is also sending me some pics. As I said above I can't find Moss 401-220 or 401-230. Moss Europe shows 401-220 as an MGB RH door lock. Does anybody have the correct Moss (or preferably AS) part numbers for the two TD plates & do these after market plates carry captive nuts with the original thread, which Jim believes is 2BA? Any & all info on the original components would be greatly appreciated, no matter insignificant or obvious it may seem. Cheers Peter TD 5801 |
| P Hehir |
| Peter. This will get you going. I have a few more, tomorrow I will take some up to date pictures. This is, I believe, the original left door pillar. this picture shows the FH screws securing the striker and the plate to the pillar. This pillar was replaced. You talk of some part numbers. 401-220 AND 401-230. I do not believe you have valid numbers. The plate under the striker plate is listed as 401-420, the plate under the door latch is 401-430 
|
| JA Benjamin |
| Thanks Jim & Rod. Those numbers are correct. (I'd first tried 401 420 & 401 430 having left out the - & got no result & I subsequently entered the incorrect ones with Moss Europe). Seems Sportsparts here in Sydney have all four plates at around $60 all up so I'll proceed with them. Though cheaper in the States the outrageous shipping & our dollar makes them less expensive here. I've attached a pic of a lock I downloaded from Ebay which shows 7 possible screw locations. The four at the corners I guess are not seen however two of these need to have the correct thread (to mate with the captive nuts in the plate) & the other 2 corners are presumably just wood screws? The chromed cover is secured with 2 chromed pan head slot machine screws (early TD) which are visible & are probably 2BA? There also seems to be provision for another fixing as well. If this is so it's presumably another wood screw? All four screws on the striker are visible & again the two in Jim's pic look like chromed pan head slots. Jim does the pencil indicate the location of one of the two wood screws? Thanks mate. I appreciate your help. Cheers Peter TD 5801 
|
| P Hehir |
| Peter the 4 holes in the corners are as you describe correct. The other hole is used in some applications for a small lever that locks the main lever from opening. Have seen this on some cars but not usual. |
| RODNZ |
| Peter This will give you a clear representation of the components; http://www.angloparts.com/en/catalogues/picture/800 If ever you want the best images of components always look at the Anglo Parts catalog, one its in colour, two the images are larger. Dont be surprised if you have to elongate holes in the plates or rout the pillars to obtain full locking penetration. Graeme |
| G Evans |
| Thanks Graeme. I've now saved it & I've bookmarked the site. These images are great & make the components & assembly really clear. I now know enough to get myself into real trouble :-) Much appreciated guys. Cheers Peter TD 5801 |
| P Hehir |
| Some more pictures. First frame: The replaced front pillar but there are no holes for the captive nuts yet. Second frame: The replaced front pillar from the inside. The hole for the lower captive nut is visible. The mortise for the attaching plate is visable. I am nailing the front Q panel skin to the pillar. (In retrospect I should have trimmed the panel back to meet the mortise edge.) The metal covering the area where the striker will extend into the opening has not yet been cleared away. Third frame: This is the left side (original) pillar showing the captive nuts. I think you said you have the Quarter panels on and did not install the captive nuts. There is a way out. There are brass inserts. threaded ID for machine screws and threaded OD to screw into the wood. They will do the job for you. If you want I can post a picture. Jim B. 
|
| JA Benjamin |
| Thanks Jim. Pics are great & useful. I'm very interested in the brass inserts & I assume they are 2BA internal? Can you advise where you think I could get such an insert from? The 2BA thread is probably the killer though. Maybe I need to start with the insert & re-tap the 2BA aftermarket plates on the door as these fixings are not seen. Solves the door issue, but not the striker, as I'd like to use the original visible NOS screws there. I do have a 2BA tap (useful when making the bottom assembly angles for the windscreen frame) so I could also re-tap the brass insert or maybe even use an unthreaded insert & tap it myself, if such a thing exists. Discovered yesterday that the Sydney supplier of the plates also sells a door screw kit that is incompatible with the captive nuts! (Difficult to get my head around that one). As if things weren't tough enough already... Cheers Peter TD 5801 |
| P Hehir |
| Good Morning Peter. Here is a picture of the inset of which I speak. They are common to woodworkers. This one has a 10-32 internal thread. 10-32 is so close to 2BA that they are ALMOST interchangeable. Since you have a 2BA tap any (potential) interference can be taken care of. You start by drilling an 11/32 hole, (I would recommend using a Forstner bit if possible. The insert can then be screwed into the wood. You have the proper threaded for your machine screws. I have used them in several spots on the TD. One of the more interesting was at a corner lap joint on the Door. The fasteners had pulled out and new ones would not hold. The wood may have been a bit "punky". I made a largish clearance step part way through the top of the lap joint. I then went through the top and bottom of the lap joint 11/32 and then, clearance, through the remainder of top piece of the lap joint. I then inserted the insert into the lower half. I made a stepped wood ash insert of the remains of the front pillar. That fix is in the second and third frame. I have a box of these and if you cannot secure them locally I could drop 4 or so in the mail. If you can find them, I would recommend you also get the inserting tool. If I send you some I will include my (shop made) tool. Jim B. 
|
| JA Benjamin |
| Peter, I don't know if this helps but as a result of my defective Silent Travel door latch (see thread "Driver (LHD) Side Door Lock") I am in process if replacing both the latch and the LH hinges. An angel from this forum sent me a like-new latch and I ordered hinges from Moss. The Moss solid brass hinges seem to be of good quality. he latch is identical to the old one but not as worn and distorted. Based on what I see upon removal of the inner panel on the door and behind the seat, I believe that I have original wood and metal. The latch attaches with two wood screws toward the front and two machine screws into a plate with captive nuts toward the rear (see attached image). The captive nuts seem to have the same thread as the longer screws that Moss sent when I ordered the wind screen screw set (Moss 323-918) and are probably 2BA but I don't have any way to check except that the thread easily into the captive nuts for the latch - the PO forced some brass screws that I suspect are #10 (or maybe #12) UNF into the captive nuts but fortunately the brass gave way to the steel. I hope to get the door rehung this afternoon and hopefully will have acceptable latch alignment but will probably have insert some shims to get there. Jud 
|
| J K Chapin |
| Peter There is a company "The Wood Works" ( http://www.thewoodworks.com.au/ ) near your in Mona Vale (Sydney) which supplies Brass Inserts, etc. For larger thread T Nuts try the fittings section in your local Bunnings. Timber cupboard leg joining bolt threads are Whitworth. cheers Stuart |
| Stuart Duncan 1953 TD |
| Thank you yet again Jim. Seems even the 10-32 is unavailable in Oz (tried the Wood Works Stuart but no joy). I've contacted a company in India who are able to supply 2BA brass inserts for use in wood & am now waiting on a reply re cost & lead time. I believe I only need 8 but I'm pricing 2 dozen including shipping. Once suitability is confirmed I'll post the details here. I've attached a pic showing an alternate method of insertion which just requires a 2BA bolt or machine screw & a couple of nuts. Seems like the way to go as using a screw driver in the slot provided in the insert is not recommended. Cheers Peter TD 5801 
|
| P Hehir |
| The Indian connection proved a dud so I'm back to sourcing the inserts locally. 5mm brass inserts are available & I'll use those for the hidden fixings. 2BA machine screws will screw into a 5mm nut, though just a little loose. It seems I may have to use the 5mm inserts for the visible slot heads on the striker & if I can't find 5mm nickel or chrome pan slot heads, then I'll use the original 2BA's. Thought about using 1/2" brass threaded machine screws as an insert with a hole drilled down the centre & then tapped with a 2BA thread but the 1/2" brass screws were way too pricey. Cheers Peter TD 5801. |
| P Hehir |
| Peter I procured some inserts from my local hardware that I used to attach my tank straps on the TF. Cant remember the brand name or if they are available in various sizes, they were screwed in with a hex key and had a very coarse external thread which made them very secure. Might be worth doing some Googling. Graeme |
| G Evans |
| Thanks Graeme. Got your email. Cheers Peter TD 5801 |
| P Hehir |
| Ordered 5mm inserts from the Wood Works (thanks Stuart) & am picking up the plates from Sportsparts. Classic Fasteners in South Oz may be able to supply the 2BA fixings & I'll use 5mm for the ones that aren't seen. Thanks to all who have contributed to this thread, Jim B & Graeme in particular. I hope others have found it as useful as I have. Cheers Peter TD 5801 |
| P Hehir |
| Picked up both the door plates & the plates for the striker. Good new is the door plates are a perfect reproduction of the original & the lock fits nicely. However what really burns me up is that the striker plates aren't even close. Not within a bulls roar! I have the original OEM Silent Travel strikers & none of the holes line up with the plate. They're not even close. Miles out!. What a joke!! Tried to take a pic to post here but that will have to wait till tomorrow as I have flat battery in the digital camera. Boy have I had a gutful of AM parts. Not happy. Not happy at all!! Peter TD 5801 |
| P Hehir |
| Peter, I bought one new plate for striker mounting and it was the same as the original. I share your frustration with faulty parts though. |
| Max Irvine |
| Peter, This is the brass cam lock I made for my doors. It is just to stop the odd person who looks with their hands and not their eyes. Or, the passenger who says "What's this handle for?" when you are driving down the road pace. It is not designed as a stop the doors flying open if you hit a huge pothole. Mind you that said. If your doors are fitted really well and the tongue engages the second hole in the latch device correctly. It will go a long way towards that function. Both my doors latches covers already had the small slot on the rear side to allow the cam to protrude through it. I don't know why they are not longer supplied with new complete latches? Someone else on this forum did show another bent metal cam. Which was a lot less elaborate. Possibly an archive search will find the info and picture. I just tend to over engineer everything :) It took a couple of hours to fabricate out of a 1/2" brass bar. Rod 
|
| R. D. Jones |
| I guess two out of four ain't bad Max. I'll now do what I was going to do in the first place & make the striker plates myself. What I found intriguing about your pic Rod is the spring at the end of the lever. Took me a few minutes to figure out how to assemble the lock from my bag of bits but that spring was missing. Is that part of your mod or is that an original component? My latch covers also have the slot so if ever I get the old girl finished I'll knock a couple up. Might even lash out & get them chrome plated. Also toying with adding a second plate behind the lock so that all four corners screw into captive nuts & as well as making each of the striker plates with four captive nuts, one for each of the striker screw holes. That way I'll have a greater degree of adjustment without having to use wood screws at all. Also just discovered the new handles I purchased in 1970 have shafts that are too large for the lock. Today just wasn't my day. Cheers Peter TD 5801 |
| P Hehir |
| here are some pics of original silent travel door snib. Pic 1 Ray TF 2884 
|
| Ray Lee |
| Pic 2. the bit of coke can was to stop an annoying rattle, now fixed. The spring was removed for clarity. Ray 
|
| Ray Lee |
| Peter, if you haven't done so already, it is worth a look at " MG TD Body Build" on you tube, Ray |
| Ray Lee |
| Note that Ray Lee's door latch are situated just at the edge of the door. I have come to believe that this is the proper location since it reduces the distance the striker must extend. I am presently working on this on my TD. I also had a situation where the OLD handle square nib would not fit the hole in a new door latch. I believe I attributed it to the replating process. I had to elongate the holes in the door latch fixing plate a fit to get the fixing plate closer to the door edge. I have also plugged the screw holes wit dowels 9n the picture. They were trimmed off after they set. and the wood screws will pass through the door skin where it wraps around. Jim B. 
|
| JA Benjamin |
| Peter The spring is what gives the door leaver its return and is I would guess essential. Thanks Ray Lee for posting your solution again. :) It would be a lot less work to knock up one of those. I just went for the geometric lock deal. Rubber and nylon washer under screw head gives just enough resistance for anti rattle. Now retired, had more time on my hands as well. LOL. Rod |
| R. D. Jones |
| Just viewed the video Ray. Really impressive. The special vice grips for hanging the door really made it easy. Notice just how snug the hinge leaves are to each other! Rod I'll find a pair of suitable springs for the lever return though I'm not sure it's absolutely necessary as the striker is under a fair bit of spring pressure from the internal spring already. I'll endeavour to get the lock as close to the door edge as possible Jim & so I'll try the captive nuts there as well, using the second plate, as there is very little wood there so close to the edge. Cheers Peter TD 5801 |
| P Hehir |
| Using two plates on the door lock worked a treat thus allowing a much more secure lock fixing with greater adjustment, however some modification of the new plate closest to the edge of the door was necessary. The top captive nut holder was drilled out & re welded through 90 degrees to clear the tongue, a section of that plate was cut out for the same reason, the outside edge at the top of the plate was radiused slightly to follow the curve of the door & two 5mm brass inserts were installed to secure the plate. I will need to fit the missing spring at the bottom of the lever so if anyone is able to provide a source for a suitable spring it would be much appreciated. The next step is to engage the striker with the lock & use the assembled unit on the door, which I'll sit on packers in the opening, to mark out the position of the striker on the jamb. As stated above the striker plates will have to be made from scratch however I intend to recycle the captive nuts & holders from the ill fitting AM plates & use four brass inserts & four captive nuts on each striker. There are no wood screws used either on the door or the jamb with this method. Pics to follow in a day or two. Cheers Peter TD 5801 |
| P Hehir |
| The attached pic shows the lock installed using two plates, one of the two 5mm brass inserts (at the base of the black handled screwdriver) used to secure the plate & the machine screw with 2 nuts used to fit the insert. The marked difference between the AM striker plate & the original broken Silent Travel striker (at the right of the pic) is easily seen, confirming their incompatibility. This is clearer in pic 2. The assembly on the left shows a modified AM plate (with the captive nuts removed for relocation) & the original striker. This will be used to determine the best orientations of the proposed 4 captive nut holders as well as the locations of the 4 brass inserts to secure the plate to the tub pillar. The plate closest to the door edge is yet to have the cut out effected around the tongue. Cheers Peter TD 5801 
|
| P Hehir |
Pic 2

|
| P Hehir |
| Peter just had a gander at your second image and have a question. Did you confirm that the concave section of the bracket is correct? The depth of this affects the distance between the holes that have nuts attached. I found this created difficulties when I did my latches and had to also rework the dish in the door pillars to get everything to fit correctly. This is not the only issue with the plate you have shown it is depicted 180 degrees out of phase, the nutted holes go inboard not outboard so the cylindrical section of the wedge sits in the concavity of the bracket. Mind you I am not saying that the bracket is correct. Graeme |
| G Evans |
| Graeme the second pic is just to show that the holes don't align. The concave profile in the AM plate does follow the original Silent Travel striker perfectly so I'm confident I can use the AM plate as a template to make my new plates, (as long as I completely disregard the location of the holes). No matter how the original striker is offered to the AM plate none of the holes come close to lining up. This plate does however closely resemble the plate in the Anglo Parts illustration mentioned above (which also depicts a wider AM striker). My pillars have both been replaced & at present have not yet been dished or routed to receive the striker plate. The pic attached shows what I believe you've described as the correct installed relationship of the striker & its plate. Clearly none of the 4 holes in the striker are within coo-ee of those in the plate. The 2 captive nut holes are hidden (inboard) under the striker. I intend to dig through Chris Couper's gallery to get a clearer picture of some original installations. Cheers Peter TD 5801 
|
| P Hehir |
| Mystery solved. There were two types of Silent Travel strikers made, a wider one & the original narrow version which I have. I assume the narrow ones were replaced by the wider type, as the originals were prone to breaking. The plate that is supplied today is made to suit the later wider type which is why my striker holes don't line up! I now intend to proceed with improving the security of the striker assembly by using four captive nuts instead of just the original two, as well as the four brass inserts. I'll also make sure Graeme that I have the wedge sitting in the dished part of the plate when I fabricate them. Thanks for your help. Cheers Peter TD 5801 |
| P Hehir |
| Peter Sorry mate you still have not got the assembly correct the stiker has to be placed downwards in your last image. When you do that I would be surprised if the two widely spaced holes do not line up. The stiker needs to hang proud of the pillar as far as practical to obtain maximum penetration into the wedge in the lock. I even had to place washers on the striker spigot to get the desired result. Apologies for the image quality however this is how it finished up on the drivers side of the TF. 
|
| G Evans |
| Graeme I hope the attached pic now shows the arrangement that you suggest. With the striker nestled in the center of the plate & lined up with the edge of the plate, the top hole is the only one that does line up & this puts the captive nuts well inboard of & clear of the striker. Clearly this can't work. When I make the new plate I'll have all four captive nuts below the holes in the striker with the striker edge & the plate edge aligned as shown below. Hopefully this setup should work. Now that I understand the relationship of the plate & striker I'll engage the striker & lock with the lock fitted to the door (on packers in the opening) & then mark up the position of the plate on the door pillar. The four inserts will be roughly in the position of the four visible holes in the plate. I may have to use washers as you suggest if there isn't enough room on the pillar to mount the plate. I'll be mounting both the striker & lock on upholstered board of the same thickness so that shouldn't affect things. Thanks again for your advice. Cheers Peter TD 5801 
|
| P Hehir |
| Peter; I think you now know this but your strikers are incorrect. They should be wider and have a notch in them Also there is almost ZERO excess room for the striker to fit into the latch. UP - Down on the door post must be perfect as well as having the striker engage the latch within a fraction of a mm. This will require you to test wit the upholstery on. You may need to add shims under the door latch. You will need to adjust the extent to which the striker sticks out with washers. You can also move the rubber mounted sleeve in and out a bit by pressing on the OD in a vise. There are so many variables that just getting them correct is a task. Jim B. 
|
| JA Benjamin |
| Jim I believe the thinner strikers were the originals that were fitted to early TD's. They do have a notch & they engage into the lock perfectly with no play. The addition of the extra captive nuts should allow me more adjustment in all directions. I realize it will still be a battle however & I'll almost certainly have to use shims & washers. Cheers Peter TD 5801 |
| P Hehir |
| Rod Brayshaw has confirmed that the early TD had the same wide strikers as the later TD & TF. There was no change as the factory build sheets show the same part number for both the TD & TF. The thinner strikers were used on M.G.'s from the P types to the TC. The wider version was introduced for the TD. Thanks Rod. I'll stick my pair of NOS TC strikers on Ebay & try & find a wider TD/TF pair. The plates that I've just purchased do fit the wide striker as I was able to overlay them today using some borrowed original TD strikers. I still intend to eliminate the wood screws & so I'll need to determine a new location for the 2 additional brass inserts. I have managed to find one original bottom lever spring so I'll see if there is an over the counter spring out there somewhere that comes close to matching it. Still unsure of the location of the circular wave washer though. Perhaps between the lever bottom & the die cast spindle follower with the square centre? Anybody? Cheers Peter TD 5801 |
| P Hehir |
| I have been able to find a pair of original springs (pic of one attached) but thought you guys would get a kick out of this quote from a local spring manufacturer: "Thank you for your time on the phone today. Very easy for us to make, impossible to find off the shelf due to leg on one end off to the side. I may be able to make 2 off for $ 400 + GST for a pair = $ 200 each, as it will take 1 day or more to make them etc, only because I am a car enthusiast myself. Looking forward to working with you further". Yeah right... Cheers Peter TD 5801 
|
| P Hehir |
| You have a pattern, buy some piano wire and go into production. Not hard to wind a spring with a good vise, a mandrel and a pair of vise grips. The loops may require you soften the wire at the ends of the spring coil. All doable for a man with too much time on his hands. Smile |
| G Evans |
| Maybe when I get the car finished Graeme.. Cheers Peter TD 5801 |
| P Hehir |
| Driver's door is now hung & hardware is ready to be fitted. Hinges rebushed & tapped metal plates fitted to the tub & angle iron to the door hinge stile. She now swings just like a bought one. Currently working on the passenger door which was a real mess. The hinge stile & the bottom rail are 60's replacements made out of what looks like Australian Red Cedar. The rail was misshapen to match the ugly heavily raked sill timber in the tub. I have replaced this sill with Alpine Ash making a mirror of the sill piece under the driver's door. The sill, stile & rail were obviously the result of a bodgie repair by the guy who bought the car in 1967 & subsequently pranged it. There was evidence of brazing to repair rust in the door skin, which had set fire to the hinge stile as most of the bottom had been burnt away. See pic. Also using Alpine Ash to remake the door rail & stile. The rail was roughed out with a jigsaw to achieve the compound angles & is about to be linished to realize its final shape. I'm fabricating new sheet metal pieces from .8 mm gal steel sheet to clad the rear of the hinge stile, a piece of which you can see in the pic. I battle on. Cheers Peter TD 5801 
|
| P Hehir |
Hinge stiles old & new

|
| P Hehir |
| The following pic shows the modifications to the driver's door. This was inspired by the mods carried out by Don Harmer detailed in his post above. I used two plates on the B pillar, the top one has 3 tapped holes for the 1/4" Whitworth slots, (I did away with the wood screw) & the bottom one has 2. The nuts & washers have been deleted as they are now unnecessary. The door carries 2 lengths of angle iron again tapped & fitted without washers & nuts. I'll be reusing the original sheet metal internal hinge stile reinforcing piece on the door. Both the plates & angle iron are able to "float" to enable me to set the hinges to the perfect position with an even 3mm quirk when viewing the outside of the door from the rear. The holes in the timber pillar & stile were deliberately left oversize to facilitate this adjustment. Once I'm happy, the angle iron will be secured to the door stile with a couple of countersunk screws & the B pillar plates will be welded into position. This modification not only affords a more secure door but also means the door or hinges can subsequently be removed if required without having to remove any of the interior trim. The lock now carries 2 sub plates, the original one for the rear with its pair of captive nuts & a new one at the front. This began life as a new rear plate but had its captive nuts removed & reoriented & the plate checked out at the tongue. This now permits 8 points of adjustment, four on the lock & two on each plate. The bad news is the passenger door is a bloody disaster! Looks like some serious timber & sheet metal work is required at the top of the B pillar due to the lousy repair on the pranged passenger side. More later. Cheers Peter TD 5801 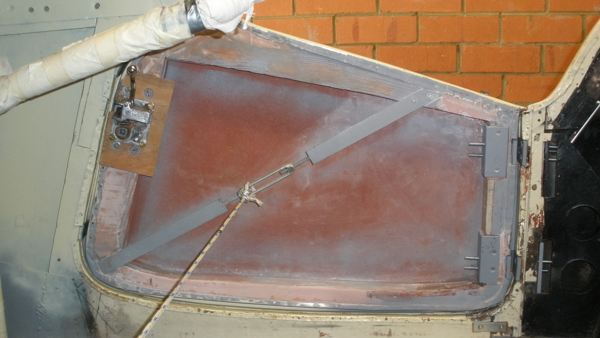
|
| P Hehir |
The passenger side..

|
| P Hehir |
This thread was discussed between 24/04/2015 and 02/10/2015
MG TD TF 1500 index
This thread is from the archives. Join the live MG TD TF 1500 BBS now