MG-Cars.info
Triumph TR6 A few good laughs BBS discussion at MG-Cars.info

MG-Cars.info
Welcome to our Site for MG, Triumph and Austin-Healey Car Information.
Recommendations
Parts
TR parts and Triumph parts, TR bits, Triumph Car Spares and accessories are available for TR2, TR3, TR3A, TR4, TR4A, TR5, TR6, TR7, TR8, Spitfire and Stag and other TR models are available from British car spares and parts company LBCarCo.
Triumph TR6 - A few good laughs
| Some time ago, a thread appeared concerning smoke replacement for British wiring harnesses. The folks with the BC Triumph Registry dig in to it a little deeper here..... http://www3.telus.net/bc_triumph_registry/smoke.htm Enjoy! .....and Happy Holidays to all of you! Rod |
| Rod Nichols |
| Rod, Very cute..thanks, and all the best of the season to you and yours ...and to all you other TR family's out there ! Cheers Charlie |
| Charlie B. |
| Rod, Someone has WAY too much time on their hands:) db |
| Doug Baker |
| Doug, Out of self defense, I gotta tell you that one was emailed to me. I really don't spend my time looking for these things! Makes you wonder about the people that put all this together. How do they find time to work on their car to see if that smoke escaped??? And.....how's your car coming along? Give us an update! (I may have just hijacked my own thread?!?!) Rod |
| Rod Nichols |
| Hey Rod, Project is well...percolating...sort of. I've just completed major house renovations, got the Christmas decorations out and hopefully will soon have a few days to get back to cutting, grinding and welding!! Not much progress the last couple of months, but I think I have a couple of exterior pieces ready for sealing primer and thereafter top coat. Just got some metal wash and POR solvent this week in anticipation. Meanwhile since I have not been able to get to the shop, I've puttered in my workshop. Started rewiring the heater motor last night, discovered that I need new wires so emailed Dan/Mike for a set of wires. Don't think their wiring harness had the internal heater wires and mine are beyond recovery. I've decided to try to remove the entire driver's floor pan and replace it rather than just cut out and patch the hole. I'll begin that hopefully soon. Question...if you've rebuilt your heater, did you note any interference with the housing and the large resistor on the heater motor? Seems awful tight or maybe I'm doing it wrong again. I did not record the disassembly of the heater and have found no exploded diagram of the innareds anywhere. 'nother question, there was a hollow tube, hard plastic of nylon electric taped and tied to the hose from the Master Cylinder to the intake manifold. Appeared to just be a very small tube and the other end was just hanging loose. What the hell is this? A sensor of some sort or ?? I'll send you a photo of the thing. I'm also removing, cleaning and powder coating various pieces from the chassis/engine/etc. as I have time between body work and other stuff. How about you. Snow in the mountains of Boise? What's your winter project? BTW, had our End of Year Celebration last Thursday evening...Stronachie, 12 y/o 86 proof; Dallas Dhu, 31 y/o 98.8 proof; Craigduff, 33 y/o 95 proof and Mosstowie, 27 y/o 108.8 proof. You should've been here:-) db |
| Doug Baker |
| Doug QUOTE" 'nother question, there was a hollow tube, hard plastic of nylon electric taped and tied to the hose from the Master Cylinder to the intake manifold. Appeared to just be a very small tube and the other end was just hanging loose. What the hell is this? A sensor of some sort or ??" Since we are both same year I shall answer this question. It is the vacumn line from the dizzy vacumn advance to the rear carb. You will see at the bottom of the rear carb a pipe for the hose to attach to. Mine is plugged off. Sounds like some very nice years..bet they went down very nicely:) Rick |
| Rick Crawford |
| Doug When I rebuilt my heater, I noticed no interference with the resister. Regretably, I did it 4 years ago now and my memory is faint as to how I put it back together so I can't help you too much with the problem. All I can say is it should go back together and fit well. Good luck with it. |
| Michael Petryschuk |
| Doug, I have the heater assy out of the parts car (you know it well) that I might be able to dig out for a photo session. Stay in touch! Rod |
| Rod Nichols |
| Thank Rod. Photos of the innards would be very good. Maybe we could add it to CD III db |
| Doug Baker |
| Doug- I got new wires from Dan to redo the heater wires. I had to let him know what color. The first time he sent me a wrong color. As you can see those don't come in the kit. I would suggest get extra black wire . I think I ended up getting about 50 feet extra at least maybe even more. Of course my situation is totally different. |
| DON KELLY |
| ....looks like the next owner of Don Kelly's TR6 will find out Don grounded the heater motor to the taillights.....(DPO) ;) Rod For proof, look at the picture of his dash?!? |
| Rod Nichols |
| Ok wise guy. I ran my heater ground to picture # 1 and then I ran that to Picture #2 which is then connected to the battery. http://i123.photobucket.com/albums/o316/donkelly23/DSCF1975.jpg http://i123.photobucket.com/albums/o316/donkelly23/DSCF2099.jpg I have 4 of those on my car. There is also one in the boot and one behind the grill. 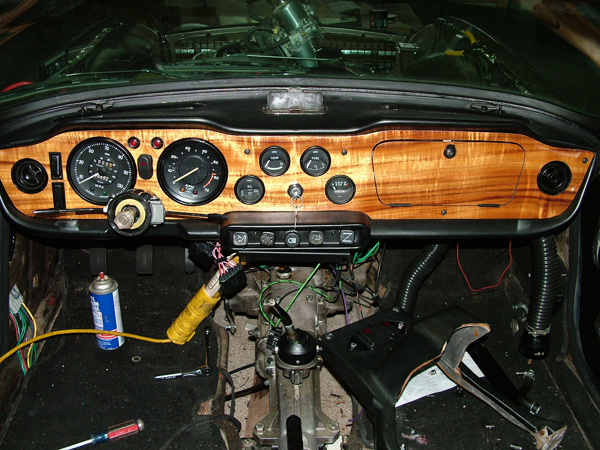
|
| DON KELLY |
| Don, That really looks great! Looks like you're really moving ahead....think you're gonna drive it this summer? Or do we have to keep after you? (keep it up, we're all pulling for you) Rod |
| Rod Nichols |
| Don, Where'd you get 'em and will I need 'em too? db |
| Doug Baker |
| I bought them from a marine supply place. It's up to you how you do your grounds. You can do it like the factory and solder them all together and connect them to basically 1 place. I just don't want the ground problems common with these cars |
| DON KELLY |
| Don, I obviously have not gotten to this phase yet, but I recall a grounding tang (male plug, I guess) soldered to the battery tray and another one near the grill soldered to the body and there were a couple of other, I think. Did you use these? I don't recall just which circuits would have been grounded to these locations, but was attentive to make sure they were not compromised in the tear down and painting process. Did you reuse these with Dan's harness or go completely with your grounding straps? db |
| Doug Baker |
| Doug- I didn't use any of those tangs. they seem to be a constant service item to keep clean. There is also 1 next to the wiper motor probably for all the relays and motor there. All 3 of my buses tied to the front one which was connected to the battery ground which is tied to the chassis and motor. I would think you can't get any better than that. The beauty of Dan's panel is you decide how you want to do it. Remember the more elaborate the more wire it takes and the more labor intensive.I kept having to buy more wire from Mike as I kept changing things. At least that part is done.The image enclosed is the method I used for all the grounds on the instrument panel. That is then connected to the #1 picture in the previous post. Now I am in the process trying to install my SECOND hi-torque starter I have bought. This one is from Ted and is suppose to fit with my style oh headers. Does anyone want to buy a brand new Hi-torque starter that has never been mounted for more than 1 hour? It has never even spun. Don 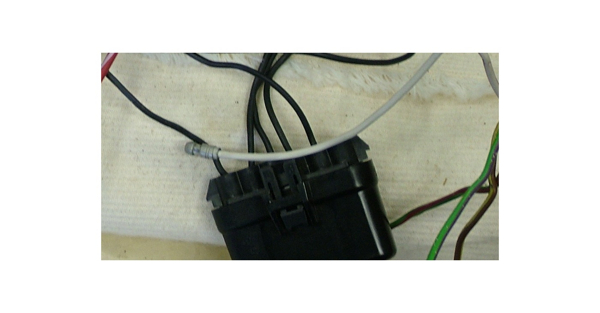
|
| DON KELLY |
| Don...how much?? and again...why are you not using it? db |
| Doug Baker |
| I have the Triumph Tune headers and they take up to much room. So I needed to go a different route.Ted's starter fits with these headers. $150.00 + shipping. Sell on ebay for $190-$200. They have a clockable plate on them to rotate the starter to the best position. Don |
| DON KELLY |
This thread was discussed between 02/12/2007 and 06/12/2007
Triumph TR6 index