MG-Cars.info
Triumph TR6 Body work BBS discussion at MG-Cars.info

MG-Cars.info
Welcome to our Site for MG, Triumph and Austin-Healey Car Information.
Recommendations
Parts
TR parts and Triumph parts, TR bits, Triumph Car Spares and accessories are available for TR2, TR3, TR3A, TR4, TR4A, TR5, TR6, TR7, TR8, Spitfire and Stag and other TR models are available from British car spares and parts company LBCarCo.
Triumph TR6 - Body work
| Upon discovering more corrosion that I was willing to accept inside the rocker panels, I removed the outer panels and intend to replace them. I cut around the A & B posts but now wonder if I'd be better served removing that piece of the outer/inner rockers that cover the bottom of the posts. It would appear that the posts, floor pans and rocker panels were all assembled together. Has anyone experience with body work in these areas that'd be willing to advise me w/r what to do with the bottom of the post. I do not intend to replace the entire inner rocker, but both outer panels. Thanks for any and all advice. db |
| Doug Baker |
| Doug, I can't speak about the TR6, but that's what I usually did when rebuilding MGBs since some of the overlapping / interleaving seams were a nightmare to deal with otherwise. As long as the factory welds are intact and the sheet metal you've left behind is solid, you should be ok. Assuming you're replacement panels are Heritage (factory) manufacture, it will line up like the original did. Tom |
| Tom Sotomayor |
| Tom, Thanks for your reply. Yes the replacement panels are from TRF and manufactured to factory specs so they line up exactly. The reamaining metal is good and the factory welds are all in place. It just seems really more work than needed to drill out so many spot welds to replace metal that's as good as what I'd be putting in. I've cut out all the areas with rust through holes and am replacing a portion of the inner rockers in each foot well back to the A post and then the complete outer panel and select portions of the floor pan downturn. I figured to cut around the two door posts and fit the vertical "seams" for spot welding where I could but cut 'em down and weld in where it was just too difficult to get all that out. You've confirmed my thinking. Never did this before, but I'm learning. Thanks again. db |
| Doug Baker |
| Doug, You should be OK not removing the inner rocker around the post, however, you will need to remove a couple of the spot welds to slip in the lip of the outer rocker. I removed the outer rocker under the A + B piller with my grinder. In some spots, you will need to trim a portion of the top rocker lip where it gets burried up inside the A post. Did you also remove the back of the B pillar? Tom [IMG]http://i280.photobucket.com/albums/kk199/Tom74tr6/IM000358-1.jpg[/IMG] [IMG]http://i280.photobucket.com/albums/kk199/Tom74tr6/IM000368-1.jpg[/IMG] [IMG]http://i280.photobucket.com/albums/kk199/Tom74tr6/IM000267-1.jpg[/IMG] |
| Tom C |
| Tom Tried to view your images, but no joy, it says images have been removed or delated from photo bucket. Les |
| lw gilholme |
| To view Tom C's photos, just cut and paste the link without the [/IMG] at the end of each address. Cheers, Martin |
| M Burtt |
| Tom, Send me your email address and I'll send you like photos. I don't have compression software to upload them here. My email is dbaker04ATaolDOTcom. Thanks. db |
| Doug Baker |
| Tom, Go to drbaker04@mac.com and you'll find several photos of my rocker panels. The area of concern again are those under the A&B post. I've about decided to just trim the outer vertical tab and not try to slide it up between the post and the inner rocker. I think that I can still get to it to effect a stitching weld along what will be a seam there. That should give integrity to the whole and once POR-15'ed should be good to go for corrosion protection. You'll see why I removed the outer when you view the photos. db |
| Doug Baker |
| Opps, Tom...go to http://web.mac.com/drbaker04/iWeb/Site/TR6%20Rocker%20Panels.html db |
| Doug Baker |
| I did the driver's floor and both sides of inner and outer rockers on my car, rear inner and outer valance and several patches (butt-weld seams, ground and dollied flat)Make certain the tub is well braced for the operation, preferably still attached to the chassis. Here are a few shots of my ordeal... Rob 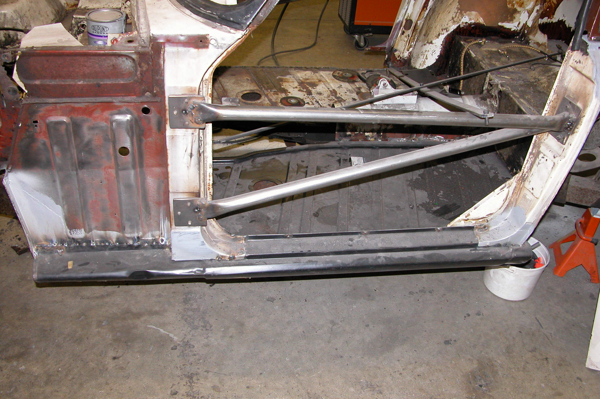
|
| Rob Gibbs |
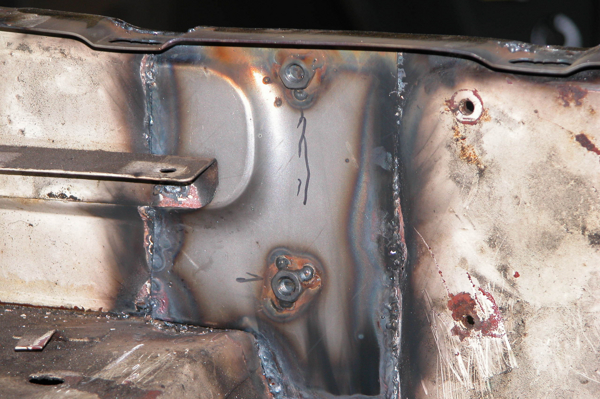
And more...

|
| Rob Gibbs |
and holes in my inner fenders...wife says my head...built an embossing die for this one.
|
| Rob Gibbs |
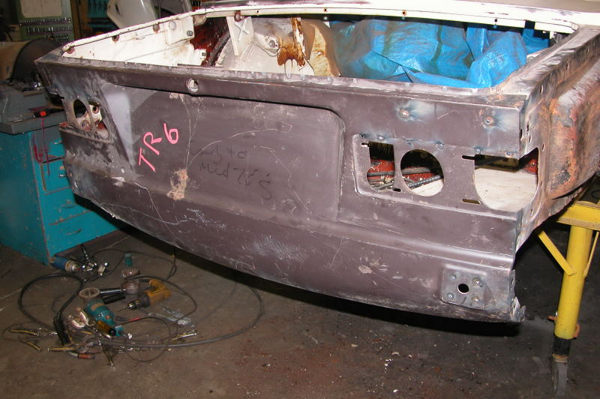
took off rear valance... lower rot in both inner and outer pannel

|
| Rob Gibbs |
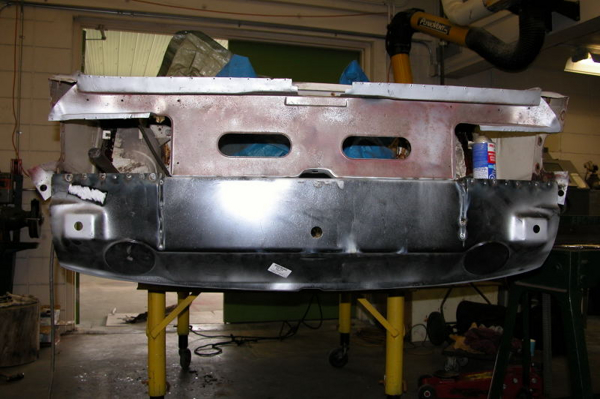
new lower panel plug welded in place...
|
| Rob Gibbs |
outer skin plug welded in place... simple!
|
| Rob Gibbs |
| Rob...you make it look so easy !!!..it's going to look great !! Charlie |
| Charlie B. |
| Doug, I understand what you are trying to accomplish. I placed all my sill replacement pix in this folder, I didn't have time to put a description with the photos so if you have a question about a particular one let me know. http://s280.photobucket.com/albums/kk199/Tom74tr6/Sill%20-%20floor%20repair/ Here is a tip, there are 2 bumps on the outer sill that conforms to the edge of the A & B pillars. You want this area to be tight up against the bottom of the pillars. I took a piece of square tubing that was as long as the "bump" and welded a 12" leg perpendicular to one edge, like the letter "T". I then put this piece inside the sill and let the bottom of the "T" stick out below the sill. Then I took my floor jack and placed it under the leg and slowly started to raise the jack. This put the sill tight under the pillar. At this point you can tack along the top of the inner sill where you drilled out the spot welds. Tip 2, do you POR15 on the inside of your new sill and inner sill while it is off the car. However, you must keep the final weld area clean. So, after you have welded the top and bottom of the outer sill and replaced one end cap, tape a crappy 1" brush to the end of a broom handle and soak it in POR15. Shove broom handle into the sill cavity and coat the interior. Make sure there is newspaper on the floor because it will drain out the bottom. Robb - also did the rear valance as you did and battery tray. Tom |
| Tom C |
| Tom, Thanks for your reference and advice. I did not plan to replace the entire inner panel so the integrity of the A&B posts w/r to the geometry of the floor is OK. Nonetheless your solution is innovative and obviously works to insure alignment. Thanks too for the advice on the POR-15. I had planned to just grind the spot that I'd weld to get good contact, but then, as you did, POR the seam and then apply seam sealer. Could not access your site from the link but will try the entire URL later. Thanks again. db |
| Doug Baker |
| I think you will need to copy this link and paste it on a new page http://s280.photobucket.com/albums/kk199/Tom74tr6/Sill%20-%20floor%20repair/ or the entire album is here: http://s280.photobucket.com/albums/kk199/Tom74tr6/ |
| Tom C |
| Tom, Visited your site by putting the entire URL in, but your last link also works OK. What's with the hand sprayer? Did you use that to apply POR to the frame? I'd planned to brush the frame just because I don't want to run a paint gun with POR, but if a hand sprayer'll work, what an innovative idea. Must be messy though? db |
| Doug Baker |
| Doug, After the frame was cleaned I coated the outside with POR+ Chassie black. The POR product lays very flat and can be applied with brush with no problem. I wasn't happy with the color of chassie black because it looks like chocolate, not black. I did one more top coat using industrial rustoleum gloss black. The only problem with this is that it shows every imperfection and weld splatter which is not what I was looking for. To rust proof the frame, I used the garden sprayer and 2 cans of Penetrol (Home Depot $9.00 each). It flows like water and will eventually solidify. There are so many baffles inside the frame you need to spray as liberally as possible. I drilled 2 holes in the rear trailing arms so I can get inside that area. I had thought of using the home made Waxoil solution and also POR in the garden sprayer but 1)The parafin in the homemade solution would clog the sprayer 2) A gallon of POR is very expensive. TC |
| Tom C |
This thread was discussed between 31/03/2008 and 06/04/2008
Triumph TR6 index