MG-Cars.info
Triumph TR6 Brake leak BBS discussion at MG-Cars.info

MG-Cars.info
Welcome to our Site for MG, Triumph and Austin-Healey Car Information.
Recommendations
Parts
TR parts and Triumph parts, TR bits, Triumph Car Spares and accessories are available for TR2, TR3, TR3A, TR4, TR4A, TR5, TR6, TR7, TR8, Spitfire and Stag and other TR models are available from British car spares and parts company LBCarCo.
Triumph TR6 - Brake leak
| Your advice is greatly appreciated........ I am leaking brake fluid through the electrical switch on the pressure valve assembly. Yes, it comes right up through the electrical plug. I replaced it thinking it was failing and the new one alos leaks. Does this mean I need to replace the valve? Thanks! |
| JS Shirhall |
| The switch itself provides no seal. The seal is from two seals on a "shuttle piston" in the valve itself. If your car is a TR250 or very early TR6, the piston is set up with two small cup type seals 9big deal to rebuild, must fabricate a new piston). If it is a later TR6, the seals are O-rings (easy rebuild). Post back with the year of your TR6 and then the options can be discussed in a bit more detail. |
| Steve Pike |
| Here is a pic of the PDWA (Pressure Differential Warning Actuator)...no wounder we call it a PDWA. If this is your unit (as Steve says, year of TR6 required to see if this one is yours or the early one) you will see the 2 O-rings. MOSS shows a repair kit but I have no idea what is in it. Obviously the switch has a gasket washer under it. Question for you. Where did you get the replacement switch? Rick '71 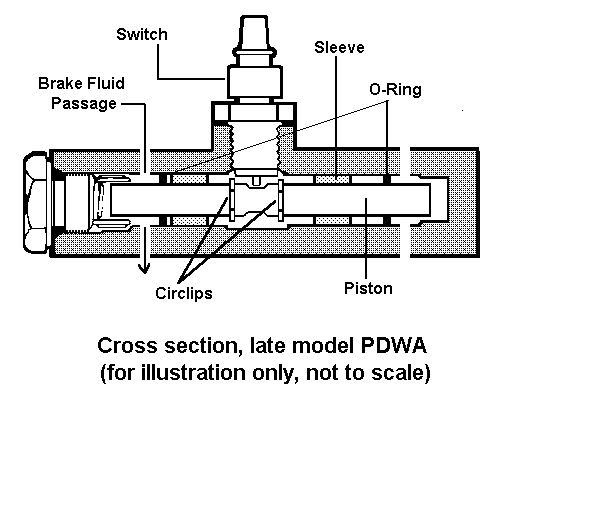
|
| Rick Crawford |
| Thank you for your comments.........yes year would be helpful.DUH! My TR6 is a 1971 Rick, the image you provided is the unit I am indeed talking about. I purchased the new switch from The Roadster Factory. Just to be clear, the brake fluid is leaking up thru the switch where the electrical connections is made. I appreciate your comments Steve and Rick! |
| JS Shirhall |
| As stated previously, the seals within the PDWA valve prevent any fluid accessing the switch area. I had the same problem and fixed by replacing the two o-rings. Easy to do. John B |
| JOHN BRUNATTI |
| Ah yes, 71 TR6, a very nice year for TR6s. If you dig deep into the archives, you will find a large number of those represented here, now on to the mission at hand. Your car should be late enough to have the O-rings as opposed to the small cup seals. First step is to obtain the O-rings, as Rick mentioned Moss has a kit. My guess is that it would include the O-rings, the crush washer for the end cap and some of the Girling red rubber grease. If you happen to already have some of that grease, you can get some of the O-rings and have at it. If you go the purchase some O-rings route, you need size #008 which is a 3/16" id and 5/16 od. The material for the O-rings should be EPDM so that they are compatible with the brake fluid. You can get them from a local industrial supply or rubber supply. Odds are that if you ask the guy at a parts store for EPDM O-rings, you will just get something along the lines of "huh?" I am going to operate on the assumption that you are not running silicone brake fluid, so you need to protect that paint. Now that you have the O-rings, first break the fittings slightly loose from the PDWA but not enough to get alot of lfuid coming out, then remove the 1/4" bolt that holds it down and spread some plastic sheeting undet it so that the draining fluid is funneled down into a catch basin below. Now finish removing the fittings from the PDWA. I generally prefer to remove the switch before removing the lines and bolt from the PDWA, but it is not necessary at this point. After the fluid has finished draining, cap off the fittings. If you don't have an assortment of fluid fitting caps, use heavy plastic wrap and twist ties ti cap them off. Pull the plastic and run some water down there to rinse off any brake fluid that may have spilled. Before disassembling the PDWA, make a small catch box that is lines with rags to soften the blow when the piston shoots out. To disassemble the PDWA, first remove the switch if not already done, then cap the two front circuit ports with fine thread 7/16" bolts and one of the rears with a fine thread 3/8" bolt. Don't really wrench these down. I have found that a "hard finger tight" is sufficient. Remove the end cap and place a blow gun from your compressed air system to the open rear circuit port while aiming the open end of the PDWA into the catch box. Pull the trigger on the blow gun and the piston will come shooting out. Without the catch box, it will wind up somewhere in the next county. Clean everything up, replace with new seals and push the piston into the PDWA body. Use your Girling grease to ease O-ring installation and psiton insertion. You can center the piston in the body using a small punch or awl. Replace the end cap and sealing washer. To reinstall the PDWA, uncap the lines and start, but do not tighten the brake lines. You can't mix them up as they are sized differently for the front and rear circuits. Replace the bolt, tighten the brake lines, replace the switch (maybe, more in just a bit). You are now ready to bleed the brakes. When bleeding, you can either follow the manual instructions for centering the piston by hydraulic pressure or you can take the easy way, pull the switch (if already installed) and mechanically center it using that same small punch or awl, just be careful at this point not to use too much force and break it. Refit the switch and you should be ready to go. |
| Steve Pike |
| Steve, That's an amazing step by step run down on what I need to do and I can't thank you enough. I have ordered the "kit" from Moss and will undertake this small task next weekend. I greatly appreciate your taking the time to respond in such detail. Jeff |
| JS Shirhall |
| Steve..., We've had this conversation before and on the chance anyone else may be suffering the same malady as me, I followed your instructions. Still have the replacement O rings you so kindly sent me. Put the air to the PDWA and NADA!! Nothing came out. After several attempts I put it all aside since it's not going anywhere anytime soon, but it still remains on the to do list. Figured that I needed to get a better fit on the air input. I was only blowing air in without sufficient pressure to overcome the stuck piston. If anyone else has this problem, is there anything else to be done...a lubricant other than brake fluid to help loosen the apparently frozen O rings? Recalling that it took 105# pressure to pop the brake caliber pistons, maybe I just need more air. The car sat unused for 18 years, but the brake system was supposedly closed during that time or most of it. Nonetheless, I have been unable to get the piston out and I don't often admit defeat. db |
| Doug Baker |
| Steve, That was so good a reply that I have added it to my collection of info and added my JPG of the PDWA to the .DOC. Very good lad. A NOTE I added to your procedure is: "If the brake warning light is on, then there is a possibility that the plunger might not be centered." I used the awl trick to center the plunger and I found this the best and easiest way to know the plunger is centered. You can actually "feel" the beveled sides where the pin from the switch sits. Doug, how about letting the pdwa sit in some WD40 for a while? Jeff, Another '71 on this BBS. See my new thread re '71s on this BBS |
| Rick Crawford |
| Well, there are a couple of things that can be tried and the problem could be due to a couple of different things or some combination of them. It could be there is sufficinet corrossion that the piston is stuck in there or it could be due to stiction due to whats left of the seals. One thing to try is as Rick suggested to let it soak in PB Blaster, Aero-Kroil, etc. Another might be the careful application of some heat. First question going back to the calipers, how badly corroded were the bores? This is askes as an attempt to assess the degree of potential corrosion in the PDWA. Remember that the 71 PDWA is a brass body with a steel piston, so there is some dissimilar metal action going on there. The other thing to remember is that there is good deal of difference between the coefficient of thermal expansion between the brass, the steel and the corrosion products. The metals both have higher CTEs than the resulting corrossion products. Running it through a few heat cycles, say up to about 200-250 degrees and letting it cool down, would help break up the corrosion products. Low cycle fatigue can potentially help you out in this case. Once you get it apart, give it the best visual inspection you can, lights, magnification, the usual suspects. Hopefully there is little to no pitting in the bore otherwise you know where it takes things, off to replacement land. Lest you be fearful of heat, I've used MAPP gas torches on carb piston bodies to remove jet needles that were corroded into them with no ill efects, although I will admit to a large pucker factor the first time I did it. |
| Steve Pike |
| Stiction Now there is a good one. Will have to remember that one. Kinda like the one I use...constructions. Rick |
| Rick Crawford |
| Steve, Re the caliber pistons, there was very little corrosion, just unused for a very long time. The top of the piston near where the wire retainer aligns was a bit rusty, but down in the bore there was little to no corrosion, and no pitting of the bore. The new stainless pistons went in very nicely once I applied a liberal dab of red rubber grease. The system was open when I bought the car because the rear drums had been disassembled and what brake fluid remained was just residual. When I removed the pipes to the PDWA, there was a bit of brake fluid that ran out. Enough to have to catch with a rag so my opinion is that the O ring is just sticking. Here's my approach...: First, up the ante on the air and get a good connection. When I did the calibers I had to jury rig a connector to get a tight fit. I have not done that to the PDWA, but need to to make sure there's enough force getting to the piston. If after successfully applying a reasonable degree of pressure, your suggestion about heat seems to apply. Rather than a torch, might I heat soak in an oven for some minutes at say 225oF and reapply the air? Regarding Aerokroil, I liberally applied several doses over time w/o success. I have not soaked the PDWA in any lubricant yet, but I guess that's doable except I gave away my open Aerokroil and only have spray cans. Dunking in brake fluid is certainly doable. Maybe I should do that for seveal days and try the air again. Thanks for the response and sorry for this long winded note. I'll let y'all know of success or failure with this renewed effort. db |
| Doug Baker |
This thread was discussed between 10/02/2008 and 13/02/2008
Triumph TR6 index