MG-Cars.info
Triumph TR6 I'm back! BBS discussion at MG-Cars.info

MG-Cars.info
Welcome to our Site for MG, Triumph and Austin-Healey Car Information.
Recommendations
Parts
TR parts and Triumph parts, TR bits, Triumph Car Spares and accessories are available for TR2, TR3, TR3A, TR4, TR4A, TR5, TR6, TR7, TR8, Spitfire and Stag and other TR models are available from British car spares and parts company LBCarCo.
Triumph TR6 - I'm back!
| So, ive been away for awhile and last time I was here I posted about possiby selling my 6 because of the economy. Well I deployed, made some money and still have the 6. The motor is back in and now just needs to fully wired. Is there anyone out there that wants to be legendary and help me do it? Im not looking forward to this at all. I just want to have her running by spring time. I know I have time, but it tends to fly by. Thanks guys! |
| SBF Fitzgerald |
| Welcome back Glad to hear you were able to keep the 6. I would love to help you out but I doubt I will have time to take a trip to NJ between now and spring. What has you concerned that you aren't looking forward to this task? Regards Mike |
| Michael Petryschuk |
| just the wireing and making sure everything goes to the right spot. I guess though if I do 2 wires a night, it shouldnt take me too long |
| SBF Fitzgerald |
| SBF, What replacement wiring are you using? A standard wiring harness or the upgrade? db |
| Doug Baker |
| I got the Advanced one |
| SBF Fitzgerald |
| Doug's your man |
| Don Kelly |
| SBF, Watch out for Don!! I ordered a wiring harness. What I got was 18 rolls of ware and Dan Master's Electrical Maintenance Handbook!! Don has actually installed Dan's wiring so he's your guy for first hand advice. db |
| Doug Baker |
| haha ok guys thanks. Yeah doug, I kinda have a rats nest going on right now. I have them sorted for engine bay and cock pit. Ill let you guys know of the progress! |
| SBF Fitzgerald |
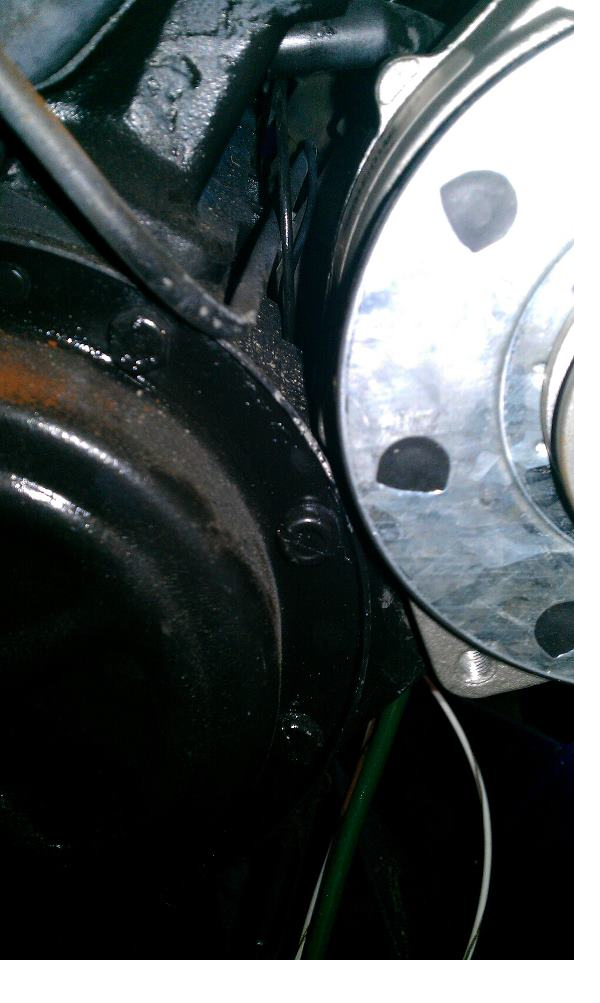
| Just run every wire to were it will terminate. DO NOT CUT ANYTHING UNTIL YOU ARE 150% SURE Here is a pic of mine 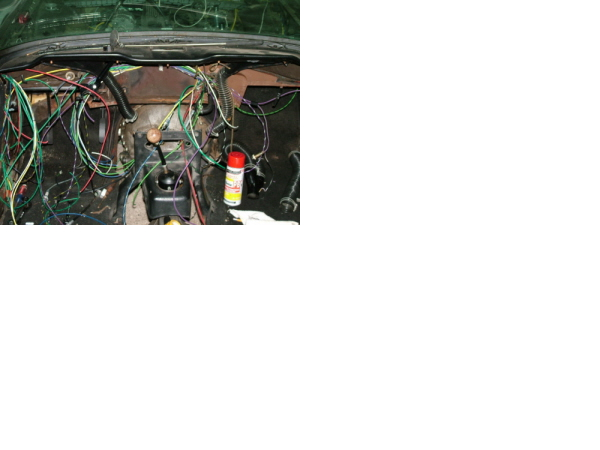
|
| Don Kelly |
| SBF, Where did you put your control module? Don put his in the engine bay on the unused shelf on the passenger side and I'm thinking of doing the same thing, but under the cubby is also an available spot, I think. db |
| Doug Baker |
| If I had to do it all over again,...In the boot |
| Don Kelly |
| Don, thats exactly what mine looks like! Doug, I actually put mine under the shelf on the passenger side. I was worried about possible rain getting on it if I left in the engine bay. |
| SBF Fitzgerald |
| Don or if not him someone else on this forum fashioned a lexan "box" for the control module to control moisture exposure. It looked good in the final fitting. I'm not there yet, but getting closer. My welding is about finished so another step in a very long process. db |
| Doug Baker |
| Bob Danielson did it . His site is here. http://tr6.danielsonfamily.org/index.htm |
| Don Kelly |
| Ok, so its going well so far with a few bumps, but nothing major. Im currently working on the head lights and front marker lights. I noticed that these have grounds with them. Am I too just wire them in circuit to the frame? |
| SBF Fitzgerald |
| In the OEM wiring harness there are ground wires to connect the lights' ground wires to but as an option you can wire them to the frame or body. If going to the body, you should make sure the connection is in contact with bare metal and I suggest you use di electric grease to fill in the connectors to keep moisture and corrosion out as much as possible. |
| Michael Petryschuk |
| SBF, Take a look at Bob Danielson's grounding strip that he used to ground all the wires at the front of the car. neat idea and insures an effective ground. db |
| Doug Baker |
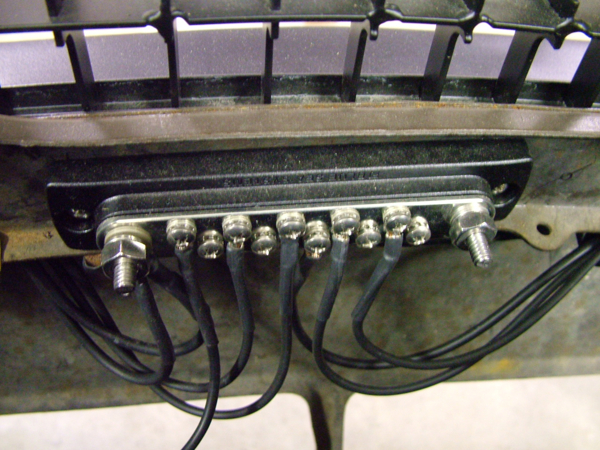
Got that from me
|
| Don Kelly |
| oh great, thanks for the help. Cant wait to get the engine bay done and move into the cockpit. |
| SBF Fitzgerald |
| SBF. Send photos as you progress. May help some of the rest of us!! db |
| Doug Baker |
| Don, What's your source for the grounding strip? db |
| Doug Baker |
| Local Marine store. Nother. This one at the drivers side where the relays normally sit 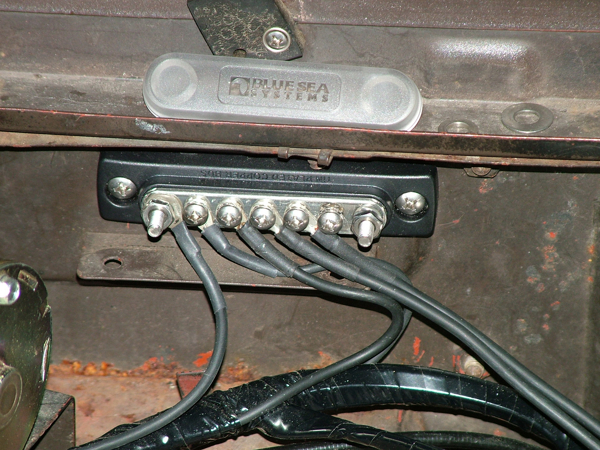
|
| Don Kelly |
| Ok, im back. So im trying to wire the starter and the respective wires. The wiring diagram shows 2 a "WR"(white/red) wires going from the relay and out. I have one from what it looks like and that runs to the ignition. Am I missing something here. Do I put a bullet sleeve in there so I can run the wire to the ignition and to the starter? I have the Advanced wiring kit. |
| SBF Fitzgerald |
| I did my starter different than what shows on the schematic Can you see this? That R/W goes to the Lucar connector or male lucar style connector at the solenoid The BIG yellow goes to the battery side of that same device. If you need more help you can call me 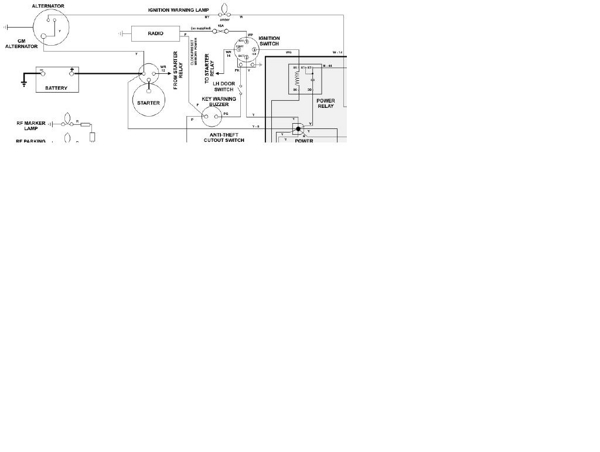
|
| Don Kelly |
| Thanks for the help Don. The pic you uploaded is a little to small, what year is that schematic off of? I have the book that has all the years in it. I will Start taking photos sunday when I start up again. |
| SBF Fitzgerald |
| Did you get a schematic with your Advance Panel?? |
| Don Kelly |
| yes sir, i have all the years |
| SBF Fitzgerald |
| What do you mean all the years? The panel is built for specific years, IIRC |
| Don Kelly |
| oooo did not know that. Well the book that came with it has the wiring diagrams for 69-76. I am using the 74 schematic-the right one. I saw the the scehmatic you posted didnt match mine and just wondered what year that was for |
| SBF Fitzgerald |
| It is for my 71. Back when Dan was doing them they were custom so not all would schematics would work. I also made a few changes in it while I installed mine and some I had Dan redo a section of the drawing and send it to me . As in this. I added the dip switch to the column instead of the floor 
|
| Don Kelly |
| Well that's the wrong drawing here is the real one For some reason my clip board is fubared |
| Don Kelly |
| Now that I rebooted , here is a couple of changes I made.And actually, after I made this change I made another and added a seconded light in the boot. Both LEDS 
|
| Don Kelly |
| ok Don, heres my dilema, after trying to do the turn signals and pluging in the hazard, the colors of the wires on the diagram dont match the colors on the circuit board. Do you think I should just contact Dan Masters himself and have him figure this out? if this is the case, I really hope all the work ive done wasnt for nothing. I like the idea of the LED's. that would make brighter light |
| SBF Fitzgerald |
| Ok, im just going to contact him because the directions in the "thin" manual tells me to connect colored wire that arent there. So I guess it will have to wait another week to get into it. I tell ya, wiring airplanes is easier |
| SBF Fitzgerald |
| What are are you doing tomorrow?? Maybe I can talk you thru it |
| Don Kelly |
| ok Don, heres the deal. After reading and looking more closely, I realized im a dummy. I was under the impresion that I was going to use the stock hazard switch. When reading he stated to used the toggle switch provided. After reading that and looking through the the wires, I figured it out, and made all the proper connections. So now Im about to wire the heater. Thanks for your patience Don! Im going to have to grab you something when im TDY in Europe or Asia. Im going go as far tonight as I can then start again tomorrow. Thanks again |
| SBF Fitzgerald |
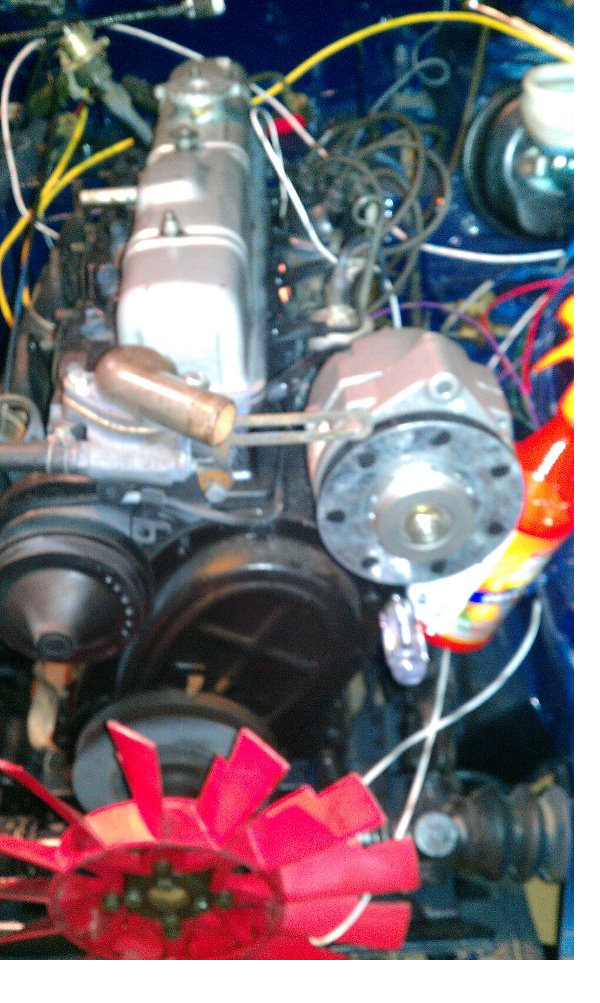
| So far so good. Im almost done with a few connections and a few things to reinstall on the motor. 2 things. I bought the GM 7127 alternator, but it doesn't fit/bolt "right in" is there a mod a different alternator I should get that will go right in? Im replacing because Masters directions say to, because im doing all the new wiring. Second, in the diagram it shows a temp switch with the black/green wire. Does that go to connection on the thermostat housing? Thanks for the help, ill be sure to start taking pictures from here on out on the rats nice to finished product. |
| SBF Fitzgerald |
| What year is your car?? The G/B goes to the fuel gauge |
| Don Kelly |
| its a 74' |
| SBF Fitzgerald |
| Saw that a few questions back. Did the color answer work for you. The alt might need to be clocked. Are you familiar with this? |
| Don Kelly |
| Ok, I figured it out. The Black/Green is for the electric dan If I added it. I am not familiar with "clocking it" When I put it in, it seems that the alternator is too big. If needed I can upload a picture when I get home to show it. |
| SBF Fitzgerald |
| I have the same unit. I'll post a pic too. Yea, I was thinking G/B The B/G is the fan switch |
| Don Kelly |
hey Don here are the pics with of the new GM alternator
|
| SBF Fitzgerald |
| Well that ain't right! Give me a better pic from farther away so I can see all of it and the surrounding area. |
| Don Kelly |
| Hey, it just Don (yuk yuk)ed on me . Are you trying to use the stock adjuster?? |
| Don Kelly |
I thought I wasx going to use the orginal adjuster, but guess not! haha hedre are 2 more pics
|
| SBF Fitzgerald |
Can't use the original and the pulley looks to big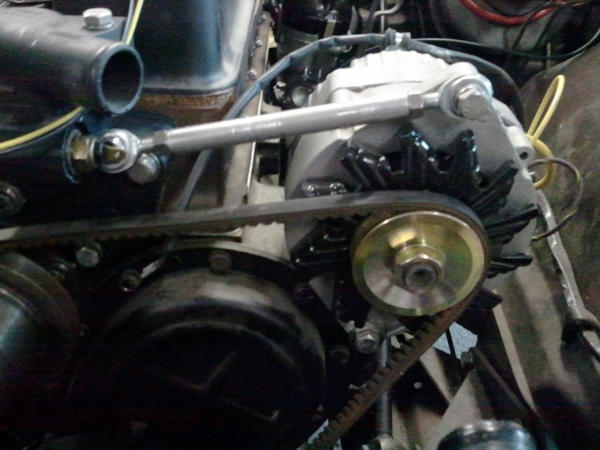
|
| Don Kelly |
| hmmmm well than looks like im keeping the stock alternator and return the other. Man I was really looking forward to the upgrade You have a nice setup |
| SBF Fitzgerald |
| SB: Try NAPA for 1980 Ford Fiesta Bosch 55 Amp. Bolts right in - no fuss. See Paul Rego's 74 TR6 website before you go any further. http://www.74tr6.com/ He has used both the 55A Bosch and 95A Bosch alternators in his TR6. I got the 55A from my local NAPA and the electrical connections and the brackets are identical to the stock Lucas. I have not yet installed it as the engine is now out on the garage floor. Rego's site is a wealth of info for TR6 drivers. Cheers, Bob |
| Bob Evans |
| He using the Advance Panel Kit. It's more or less built for the Delco |
| Don Kelly |
| Thanks for the info Bob. Don, what do you think about just switching the pulleys? take the lucas one and put it on the GM one and build a/an adjuster like yours? I Like the way your adjuster looks |
| SBF Fitzgerald |
| You can get one prebuilt from the WedgeShop http://www.thewedgeshopstore.com/products/Turnbuckle-Alternator-Adjuster-TR8.html I have that one on my Wedge. I built the one in the pic. Cost me more to do it as it took a couple of tries. Don't know about the pulley. That set up will work ,I think, with a different adjuster. Of course, it will need a different belt length |
| Don Kelly |
| Don/SB: I think for the original 55A Bosch conversion he was only running a headlight relay kit. Later he upgraded to the Bosch 95A unit and may have upgraded to the Advanced Auto harness at that time. In any case, I have sent him a PM. There are a number of thread references to the 55A conversion in both VTR and BCF archives. Very popular upgrade for the TR6. Cheers, Bob |
| Bob Evans |
| Who did you send the e mail to Bob? |
| Don Kelly |
| Ok Don, I figured out the alternator. I got the turnbuckle and ground down a little bit of the casting on the motor after I checked the fitment. The belt fits the pulley and hopefully tonight I will have that together anf finish the wiring |
| SBF Fitzgerald |
| Don: Here is Paul's reply to me on a BCF PM. "I have a Classic Enterprises upgraded fuse panel, which you can see on my site, but I still have the stock wiring harness. I also still have the stock connector as shown on both my 55Amp and my 95Amp swaps. I used both with the stock wire running to the starter and it is just fine. And you are correct in that I use the AAW headlamp Relay Kit, but other than that, my wiring is stock." Hope this helps. Bob |
| Bob Evans |
| YEa, I'm pretty aware of what he's got on that thing I was thinking you thought he had the AAW panel on his. Bob D. has it. He got his right before I did |
| Don Kelly |
This thread was discussed between 09/12/2011 and 11/01/2012
Triumph TR6 index