MG-Cars.info
Triumph TR6 Loose Steering Column BBS discussion at MG-Cars.info

MG-Cars.info
Welcome to our Site for MG, Triumph and Austin-Healey Car Information.
Recommendations
Parts
TR parts and Triumph parts, TR bits, Triumph Car Spares and accessories are available for TR2, TR3, TR3A, TR4, TR4A, TR5, TR6, TR7, TR8, Spitfire and Stag and other TR models are available from British car spares and parts company LBCarCo.
Triumph TR6 - Loose Steering Column
| Okay... I know I'm hogging the BBS but geez, I'm on a self induced steep learning curve and I'm keen to learn and fix stuff. Please hang in with me. My steering column is sloppy / loose. Where it goes through the firewall it seems there's a bushing missing but I don't see such a part listed among the usual sources. Any ideas what should be there to make things snug and safe? Will I have to fabricate something? The picture I've enclosed also shows a couple of black half circle parts that at first I thought were the missing bits but now I'm not sure. Ken The picture I took is large a file. The BBS won't accept it. I'll retake and upload it Saturday. |
| Ken Shaddock |
| There is a seal where the column goes through the bulkhead. The column is rigidly mounted by a series of brackets under the tray where the pedal box mounts and behind the instrument panel. If the outer column is "wiggly," then you either have loose or missing brackets. If the outer colum is rigidly mounted, then you are looking at replacing the bushings that fit inside the outer column sleeve. Hopefully it is column bushings and not missing bracketry as that would be harder to come by. Replacing the bushing is not a herd job, but it is tedious and fiddly with not much room to work. This is pulled from the archives, originally posted 23 September 2005, 04;47 UK time. I believe that this procedure may have been added to the world famous "TR6 CD". Perhaps Rick C will chime in to confirm one way or another. Now that I am at home, a quick dig of the box of sparks and up came a write up from when I did mine some time back. I can say with great confidence that this is not the absolute and only way to do the job, but can tell you that it worked for me. So here goes: First the Bentley book sends you on a wild goose chase to several different locations all over the book. This is what you need to do based on my experience: 1) disconnect the battery 2) remove the Speedo and Tach 3) remove the wire cover on the lower side of the column and disconnect the wires to the column switches and horn slip ring 4) disconnect the ignition switch (for steering lock cars, more on this later) 5) clamp onto the domed nuts with vise grips or channel locks and loosen but do not completely remove, the column mount nuts near the dash panel and near the firewall 6) disconnect the flange at the rubber coupling from the splined steering column or undo the clamp at the flat on the upper steering column 7) Rotate column and drill out shear bolts holding steering lock in place on steering lock cars, remove column mount fasteners. (If replacing the steering lock, you can just cut it off, be careful not to get the column if cutting) 8) withdraw the column toward the interior (easier if you have some help from someone guiding in the engine compartment until you clear the firewall) 9) remove the horn cover and pad, remove steering wheel, switch escuteons, switches and horn slip ring (you have to carefully bend up a retaining tab to remove the slip ring. I am repainting the column, if you are not, you may not have to remove the switches) 10) NOW THE THING I WISH I HAD KNOWN. The Bentley book states that you are to depress the tabs that retain the bushing in place and withdraw the steering shaft from the bottom of the column. Not knowing what they looked like on the inside, I dutifully tried and eventually after much struggle and the use of a third and fourth hand managed to extract the lower bushing and shaft. It turns out that the places you are to depress on the bushings are nothing more than molded rubber knobs that protrude out into side holes on the column and do nothing to release any sort of a mechanism or relieve any spring pressure. All they are there for is to hold the bushings in place by sticking out of those holes. Now knowing this, here is my recommendation for the bushing removal. A) get out you handy dandy Dremel and grind away those little rubber knobs B) spray some penetrating oil onto the lower bushing from the lower end of the column C) let the shaft drop down until it stops D) clamp the shaft into a vise with a couple of inches between the vise and the column E) let the knot on the shaft for the steering lock act as a slide hammer and knock that bushing out F) reverse shaft in the column and repeat the slide hammer process for the upper bushing, taking it out from the top of the column (the shaft is reversed so you are not clamping on threads/splines where the steering wheel mounts) To reinstall, I used a piece of pipe that is a larger ID than the OD of the steering shaft and smaller OD than the ID of the column housing. Dip the bushing in some soapy water and slide/drift the upper bushing into place. Then the shaft is inserted and the lower bushing will be dipped and slid/drifted into place. Now to go into shop manual mode; assembly is the reverse process so start putting all those other bits back in place. When you go to reinstall, suggest that you use an allen head fastener to remount the steering lock. If you ever have to remove it again, you'll be glad you did. If you send the car off to a new home, the new owner will also be glad you did also and just might decide you werent such a DPO after all. Same thing if you replace the steering lock, ditch those shear bolts and use something that you can remove without having to drill out. |
| Steve Pike |
| Steve about covered it. To resize the photo,use a picture tool as in Paint,or Paint Net. Or download the Microsoft tool and you can right click the photo to reze it or photobucket. In other words ,no need to redo the photo. |
| DON KELLY |
| Holy smokes Steve! I was hoping for a duct tape and WD 40 fix! Just kidding... Thank you indeed for giving me what I need to get back on track. Wiggly steering columns are unsettling. I have retaken the pix at lower resolution. You'll see the two black brackets referenced and you'll see the loosey goosey entry of the column through the bulkhead. BTW, I hear you re archives. I try to make my Thread Titles clear & simple so that in future searches by others they will pop up more readily. Ken 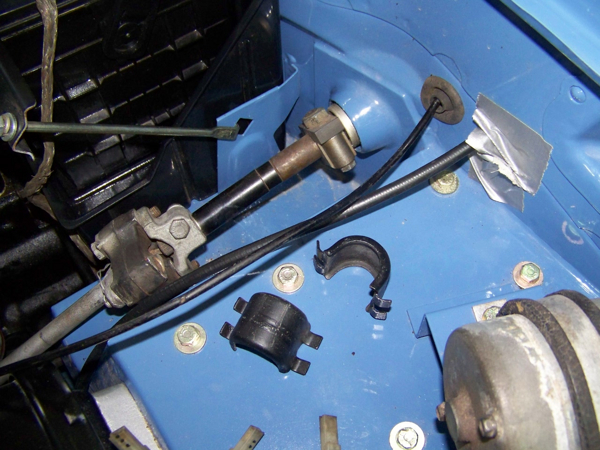
|
| Ken Shaddock |
| Hate to say it, but those are anti-roll bar bushing mounts and have nothing to do with with the steering column and its mounting. You need to dive under the dash and take a look around under there. First, go to this link to find plate DJ from The Roadster Factory Vol I TR-6 Parts Listing: http://www.zeni.net/trf/TR6bluebook/117.php?s_wt=1280&s_ht=1024 Items DJ23, 24, 25, 28, 29, 34, 35 and 43 are all of the brackets, then there are the assorted pads, seals and such that go with the brackets and the protrusion through the bulkhead in to the engine compartment. Print this out, then grab a light, head out to the car, dive under the dash looking up and see if you can find these things. If so, the situation is easier to rectify. If not, you need to start chasing bracket parts. For the actual work itself, I have found that top down or completely removed and seat pulled out makes life much easier when doing the underdash dives. It is cramped, tight working spaces under there, but it can be done. Here's to all the stuff being there so it is just a matter of reworking things. On the other hand, if they really thought those anti-roll bar brackets would suffice to position the steering column, you either need to go back through all of the suspension and braking systems or have someone do it for you as there is no telling what else they hosed up when they were slapping the car together. |
| Steve Pike |
| Sorry to mislead Steve... I did not know what those brackets were for but I did not take them off of the steering column. The front anti-roll/sway bar was not mounted to the car (I have it) so thanks for id'ing what they are for. I'll follow up on all this later. Gotta spend some time with my bride of 40 years. The Beatles are in town... well two of their ex wives are. Ken |
| Ken Shaddock |
| Ken, You drove from BC to ON w/o the front sway bar in place?? How'd it steer? I think you have more that product warranty issue with your restorer now. I'd suggest that to leave off the sway bar might be on the far side of legal!! db |
| Doug Baker |
| Yep Doug, I should be wearing a dunce cap... Actually it handled very well but then again I don't know what's normal. We had lots of twisties with minimal guard rail and with our low centre of gravity we felt solid. I was more concerned about the old Michelin Red Lines. They have lots of tread but I think they are old. That's on my list too. Learn how to read the date codes and then find out where the best place is to buy new Mich Reds. I'll stop by on the way down I-65 to FL this winter so you can see the M for Mark on my forehead. ;) Ken |
| Ken Shaddock |
| Here's the link to "how to tell how unsafe your shoes are" http://www.tirerack.com/tires/tiretech/techpage.jsp?techid=11 |
| DON KELLY |
| Don, Good reference. Thanks for the info. I read recently that tires older than 6 years were extremely unsafe and should not, under ANY circumstances, be mounted on a car if older than 6 years from manufacture. Many tires are still on the shelf even after 6 years so if this admonition be true, it'd certainly pay to check the birthdate of the tire. My redlines are likely 30+ years old and still have great thread, but recently in trying to break the tire from the spare to experiment with powder coating, getting the tire off the rim was a MAJOR hurdle. The tire was just not plyable; very stiff and set in it's ways. I won't be in the market for tires for some time yet. Still doing body work, but definitely plan to have new tires of recent manufacture when I do shoe my 71-6. db |
| Doug Baker |
| The ones om my six were done in April and March of 91. Don't even think they have 5000 miles on em! What a waste. |
| DON KELLY |
| Don/Doug... Here's what I read in Trailer Life / Motorhome Magazines on tire life: Tires for RV's used seasonally should not be used after 7 years. Tires on vehicles used all year could last longer than 7 years but that's unlikely due to tread wear. The difference is in the self lubrication from within a tire when it is in motion. Since our LBC's often fall into the seasonal category we are wise to change tires every 7 years. Not good news. My Red Line Michelins have good tread but are likely ancient. They have 3 digit codes with no way to identify the decade as per that link Don. Ken |
| Ken Shaddock |
| What are the #'s and I'll tell you the year |
| DON KELLY |
| LR: DOT FHTJ A8NX257 LF: DOT FHTJ A8NX130 RF: DOT FHTJ A8NX164 RR: DOT FHTJ A8NX424 Ken |
| Ken Shaddock |
| Those tire are all different year. must have been bought at some yard sale or put together from different cars. 1.june 97 or 87 2.March 90 3.April probably 94 4.Oct. Probably 94 |
| DON KELLY |
| Thx Don. At least they are not all 80's vintage... we hope. I'll look next spring for replacements. I expect they'll be VERY expensive if available still from Michelin or Goodyear (originals on mine were Goodyear Redband). Ken |
| Ken Shaddock |
| If you want Redlines they are available for close to $200 a piece. A lot better tires out there for a lot LESS money. |
| DON KELLY |
| Hi Ken.. Since you're going through the car I was wondering what you have found regarding that big gap between the top of the rear fender and the rear deck? That seam looked like it had a mighty big gap. Hopefully it's fixable. Henry |
| HP Henry Patterson |
| Hi Henry That gap is the result of the wing (fender) mount bolts not being tightened down propery. When I spoke to a fellow who owns several TR's and restores the drive trains of many for others he cautioned me against using seam sealer or dum dum. He likes to draw the fenders in tight using the clips and bolts and then trickle a little 3 in 1 oil along the wing seam from the top. In his opinion the cars rusted out around those seams because of the sealer which held moisture on top or below. Bottom line: I'll use fresh bolts and clips and pull the wings in snug and do the 3 in 1. I'd sooner have a functional rust free car than a concourse special I'm afraid to use. Ken |
| Ken Shaddock |
| Don... when you say that must I drop my current stock rims and go with Minilites or other alloy aftermarket wheels or can I have a good lookin' car with name brand quality blackwalls and stay with factory rims and beauty rings? Your opinion? Ken |
| Ken Shaddock |
| Stay with the original rims and trim rings ! Charlie |
| Charlie B. |
| I did not notice whether you had redlines / redbands on your car Charlie which says something. In fact, most of the time I don't look for that detail if the car I'm looking at is a good lookin' car. I have them now so I wandered down that path thinking I'll stick with that look. So, having said that it now makes sense to me to pay more attention to cars re the tires and if I like cars without the red stripe then I should go for higher quality black walls. I do like my original rims and trim rings. Can I go one size up... say a 195 or even a 205? Ken |
| Ken Shaddock |
| Did I say that?? |
| DON KELLY |
| Ken, a lot of guys, including myself are running 205's on stock wheels without any trouble at all. Rob |
| rw loftus |
| Ken, I gotta say thank you for putting some life back into this BBS. It is good to wake up some memory cells. I am still running on my old red lines and admit fully that they are....ummm.....unsafe. Ken I have to say it is about time this guys name is brought out in the open so that no one else has to go through what you did and am still going through. That was really bad of him to let you drive across Canada without the front sway bar on the car. Steve, no there is no procedure on CDI or CDII. BUT, ikn my collection of data ,there now is one....thanks. This is a job I have been putting off for a year now. I agree, pull the seat to be able to do this with a little more ease. Ken the stock rims look fine on our cars. BT, the more I see Minilites, the more I like them. Rick |
| Rick Crawford |
| Rick... I'm staying quiet for now on this guy because I have pending action against him. Once that is resolved I'll consider offering a caution. For now, anyone considering a lower mainland BC based restoration should contact me. Ken PS. The sway bar is one of 50+ shortfalls on the car. All of it is mechanical work I can do or have done and one paint area that needs fixing. If I had known I was buying a partially restored car which was priced accordingly I would have had no issues. The frame and body are excellent. Heck, the car is a beautiful car but there's lots of undone stuff. Examples: Yesterday and today I stripped and reinstalled the interior (plus tranny tunnel) to re-wire the OD, re-align the doors and put two screws in them that were lost, paint and install the sun visors, install drain hoses from the corners under the dash into the front wheel-wells, install the left front fender splash guard which was left off, install the front engine bay seal (need weatherstrip adhesive) and the finisher apron across the front valance. This requires rad shroud and grill removal. Fun stuff to do but these things should have been done. The list goes on and on... Cheers! Ken |
| Ken Shaddock |
This thread was discussed between 20/09/2008 and 02/10/2008
Triumph TR6 index