MG-Cars.info
Triumph TR6 Removing the Trailing Arm Bumper BBS discussion at MG-Cars.info

MG-Cars.info
Welcome to our Site for MG, Triumph and Austin-Healey Car Information.
Recommendations
Parts
TR parts and Triumph parts, TR bits, Triumph Car Spares and accessories are available for TR2, TR3, TR3A, TR4, TR4A, TR5, TR6, TR7, TR8, Spitfire and Stag and other TR models are available from British car spares and parts company LBCarCo.
Triumph TR6 - Removing the Trailing Arm Bumper
| The transmisssion plug prompts me to ask...how do you get the rubber bumper unscrewed from the trailing arm. With a mite of pressure, the rubber shears off leaving a large washer affixed to a rounded head steel bolt screwed into the aluminum TA. Did not budge upon first try so I aerokroiled the hell out of it for several weeks. Still no give at all. Have NOT applied heat yet, but that's next. I do NOT want to strip the aluminum threads in the TA. Any recommendations from anyone? Thanks. db |
| Doug Baker |
| Doug, if you strip it just put a keen sert or similar in it. I remember it was fun, don't remember what I did Anybody want to help out an old 6 owner? http://www.redfin.com/WA/Lynnwood/14407-Meadow-Rd-98087/home/2656655 |
| Don Kelly |
| Sorry Doug No help or recommendation here. I had the same problem. Didn't want to use heat. I can't remember if I tried heat. If I did , it didn't work, Tried drilling it and wrecked the thread and mount point. Had to get a welder to weld up with aluminum and then re tap the mount Good luck. I now have 4 extra trailing arms though because after I had the trailing arm welded up, I ended up bending the hub trying to get it off the assembly and found a guy who had several trailing arm and hub and axles which I bought to get the replacemnt hub (it was an all or none type deal) So if you damage the arm I can get you a replacement one. |
| Michael Petryschuk |
| Doug: A plumber's pipe wrench is a great tool for that kind of thing. I had two stripped (on the outer end)TA studs frozen in place and turned them easily with the pipe wrench prior to Heli-Coiling the whole works both sides. The pipe wrench will grab it and you just have to keep twisting it. As Don says, if it strips, Keensert or Heli-Coil it and if it breaks off, drill it out and then do the inserts. Don't sweat it - just go for it. Easy for me to say, huh. :0) Cheers, Bob |
| Bob Evans |
| Uh...guys...I'd just as soon not have to do a Keensert or Helicoil. I'd LIKE to remove the steel from the aluminum. Had the same problem on the water pipe in the intake manifold. Got "em out BUT all the aluminum came too. Went to a precision welding shop who refused the job. Finally got an estimate ($90USD) each side to weld up the hole and retap for water pipe thread with a flat bottom hole. Don't want to do the same thing with the TA's. They gotta come out!! Tried some gentle heat this afternoon (propane torch) and no go. They're in the garage now soaking in aerokroil. Got to break the chemical bond somehow. I'll keep at it. On a different note and maybe should start a different thread, I've been seeking the small brass ID tags for my carburettors for nigh onto 6 years now with no success. Got one, need the other. Like most things, when I could not find any and I searched literally everywhere, I've decided to make my own. My first prototype was made on wooden tooling and turned out not half bad. I'm working on a set of steel dies now and if they turn out OK, I'll be able to stamp our brass tags to order!!! Original front Carb tag on the left and the FIRST prototype on the right. Gotta work on that 0.045 groove!! Numbers will be easy to stamp once I find the right font AND the library of numbers for each year and each carb!!! 71 are 3385L and 3385R for the rear or left and front or right carb when viewed from the curb side. Don't ask why from that vantage rather than front and rear which makes more sense. I have no clue. Don't know what the 2nd number signifies and how it changes with year and carb. Anyone knowledgeable about these things? db 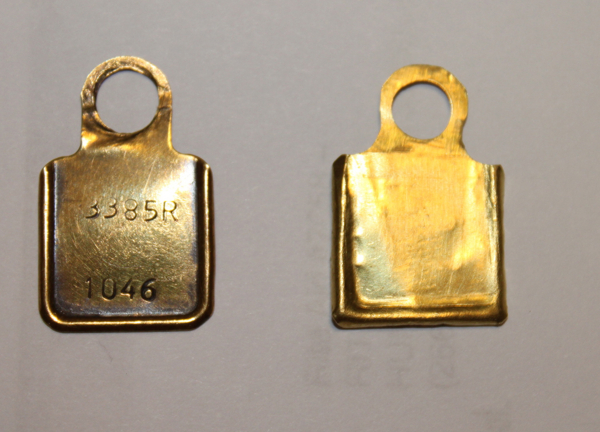
|
| Doug Baker |
| Often one heat cycle is insufficient when dealing with galvanic corrosion. What you are counting on is the differential between the coefficients of thermal expansion between the steel, the aluminum and the corrosion products to effectively break them apart and a bit of low cycle fatigue through thermal cycling is the answer. A lttle back and forth jiggling with an appropriate tool between heat cycles while still warm helps as well. I generally shoot for getting temperature in the 250 to 325 degree F range (go raid the kitchen for a probe type quick read thermometer to monitor the temperature of the trailing arm at the bottom of the bumpstop boss). Any lower and you aren't really doing much, much higher than that and you risk reducing the mechanical properties of the aluminum. As for the removal tool, I've always used a "largish" set of tongue and groove pliers. Say something like the Channel Lock V-Jaw pliers with a 16" handle length (or longer). The V shaped jaws allow for a better grip on the round metal plate and the longer handle length gives you enough of a moment arm to fight the evil demons of time and corrosion. |
| SteveP1 |
| Steve, Thanks for the description. Makes me wonder if putting the thing in the oven set for 325, then into the fridge for hot and cold soak might break free the steel from the aluminum. Will a propane torch be sufficient as you describe or do I need acetylene? db |
| Doug Baker |
| Doug: Remembering now that I used the pipe wrench on the rubber stop bumpers too after getting the seized up studs out of the TA with it. Put the pipe wrench on the large washer-type base of the bump stop and just twisted it - came off fairly easy. No heat or penetrating oil needed but it was stuck pretty good. Good luck. Bob |
| Bob Evans |
| 1) "Makes me wonder if putting the thing in the oven set for 325, then into the fridge for hot and cold soak might break free the steel from the aluminum." 2) "Will a propane torch be sufficient as you describe or do I need acetylene?" 1) No. The goal here is to apply the heat locally and leave the balance of the trailing arm structure unaffected. If you toss the whole thing into the oven it will take a good bit of time for everything to come up to temp and it's that old time at temp thing on aluminum heat treatment that could have an adverse impact on the trailing arm as a whole, i.e. you can lose static strength due to "overageing". The aluminum is going to lose heat fast enough that it will cool sufficiently fast for the this purpose. Concentrate your heat on the steel and monitor temperature at the thin section of the boss, not the ribs on the boss. 2) A propane or MAPP gas torch will work fine in this application. Acetylene scares me around aluminum, it's all too easy to get things too hot, too quick. |
| SteveP1 |
| Thanks Steve. I'll liberally apply propane and monitor temp as you recommend. Bob, tried the pipe wrench...no go and I don't want to use a cheater bar as I did with the intake manifold. Thanks all. db |
| Doug Baker |
| Weasel Piss works great as a bolt loosener |
| Don Kelly |
| Doug, I didn't even think about it, just slapped the vise-grips on and it turned right out. I do have an extra set of trailing arms in case you blow yours in place.... Rod |
| Rod Nichols |
| Rod, thanks for the offer. Let me take a rain check. May need those TA's. Don, we're all out of weasels 'round here. Ate the last one last winter during that really cold spell. How about milking off a dram or three and sending me a bottle of authentic N'rthwest Weasel piss!! I'll see if it works on my TA's. Thanks. db |
| Doug Baker |
| Weasel Piss is a Very Very good home made nut loosener |
| Don Kelly |
| Doug... Don't have Weasel Piss in stock here but do have "The Solution" which is sold in spray cans by a rust proofing company I've trusted for eons... Krown. Never had a rusty car in 20+ years. It resolves anything I've faced in the rusted, chemically stuck mode. It's a variation on the penetrating oil theme but it works. Just sayin'. |
| Ken Shaddock |
| Ken, Thanks for the offer and the reference. I have Aerokroil manufactured about 100 miles north in Nashville TN. It's advertised as penetrating 1/1,000,000,000 of an inch!! Problem is I've got to get the 'Kroil to the threads of the bolts. That honking washer is in the way. Though of cutting it down with my dremel. May do that anyway and leave a 1/2" or so square as a "nut" if all else fails. I won't get back to the thing 'til the weekend. Will report progress!! db |
| Doug Baker |
| Doug, if that stuff will penetrate that small an opening, what about drilling a 1/8" hole down the centre of the stud and filling with your stuff that way. Rob |
| rw loftus |
| Rob, Thought of that, but you have to get to the threads and that'd mean either drilling all the way to the bottom of the bolt/hole OR fracturing the edge of the bolt to gain access to the thread both/either of which I'd consider very risky w/r to "saving" the threads!! If I can get under the head of the bolt, the 'Kroil will seep down the bolt and relieve the corrosion. It'll take some time. I did this with a head bolt that would not budge. After several weeks or repeated applications of aerokroil, the bolt almost unscrewed with just finger pressure after relieving the torque of course. |
| Doug Baker |
| UPDATE, Well folks, Steve (as always) was right again; gentle heat amply applied and repeated checking for release of the corrosion did the trick. FINALLY got the things to budge and when they did, they then easily unscrewed. Used both the pipe wrench and a large channel lock pliers, but once broken free, little problem. I then used my #2 best tool in my tool box (digital camera, #1), my thread chasing kit and cleaned all the thread of the corrosion and build up. I then got frisky and decided to remove the hub studs, hopefully also without stripping out the aluminum. DONE and without applying heat!! Of course, all of these have been repeatedly subjected to liberal doses of Aerokroil over the last couple of months so who's to say was it the heat or the penetrant!! Regardless, job done and now moving on with original parts. See photo. db 
|
| Doug Baker |
| Studs removed db 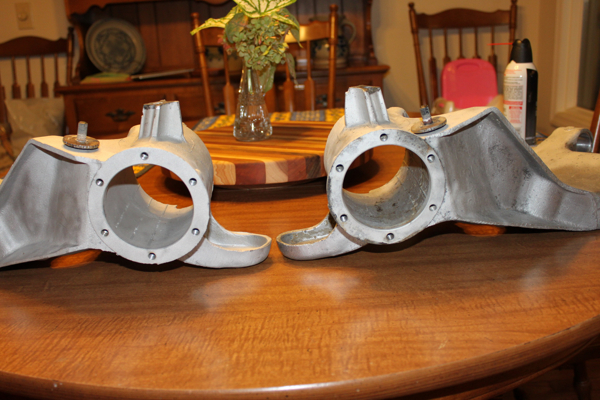
|
| Doug Baker |
| "UPDATE, Well folks, Steve (as always) was right again; ..." There are those that would argue against that position (my wife for instance), besides you've been spared most of my bone headed moves that led me to some hard learned lessons. |
| SteveP1 |
This thread was discussed between 18/08/2012 and 03/09/2012
Triumph TR6 index