MG-Cars.info
Triumph TR6 Rotten Battery Tray BBS discussion at MG-Cars.info

MG-Cars.info
Welcome to our Site for MG, Triumph and Austin-Healey Car Information.
Recommendations
Parts
TR parts and Triumph parts, TR bits, Triumph Car Spares and accessories are available for TR2, TR3, TR3A, TR4, TR4A, TR5, TR6, TR7, TR8, Spitfire and Stag and other TR models are available from British car spares and parts company LBCarCo.
Triumph TR6 - Rotten Battery Tray
| Hi all, Thought you may be interested in some battery box / scuttle surgery. I am making a new tray using a form my friend made for me to create the ribs. I didn't realize this was structural part of the body but it does keep the right and left halves of the car together. The inside of the scuttle has surface rust on the edge where water sat. This will be cleaned up and treated with 3 coats of Rustoleum Stay tuned. Tom http://farm1.static.flickr.com/222/455388912_b292b17cdb_b.jpg http://farm1.static.flickr.com/175/455388910_05d7041aac_b.jpg http://farm1.static.flickr.com/174/455388902_7c918431a3_b.jpg |
| Tom C |
| Hi Tom, Would you care to make one for me too? My 4A suffers from the same attack of the tin worm. I'm surprised no one sells this as a replacement panel. PeterK |
| PeterK |
| Looks familiar. Looks like you have the right approach Tom. Excellent progress. As the others have said, it is worth it in the end. Mike Petryschuk 69 TR6 Restoration 2002-2005 |
| Michael S. Petryschuk |
| Hi Michael, Peter, I'll post a picture as soon as I have this part formed up(it will be in a couple of weeks since we are going on vacation). The Roadster Factory does offer this part but there was no way I was going to pay $160 for it. http://www.zeni.net/trf/specials06/index.php?menu=&page=57 Tom C |
| Tom C |
| Tom, I don't suppose that can be done with the motor in? |
| DON KELLY |
| Tom, I don't suppose that can be done with the motor in? Also can you scribe how you removed it?? |
| DON KELLY |
| Hi Don, You might be able to take this out with the motor in place however, I only have a 4" angle grinder, electric drill with a step bit and a sawzall to work with. If you can use a plasma cutter, you may be able to get into the tight locations to remove the old metal. The big issue is getting access to the 12-20 spot welds at the leading edge (lip) of the battery tray. I am assuming that your don't have anything left under the dash. With the trans in place, it gets very tight under there. The DPO didn't want to deal with this and just smeared bondo over the whole area. I'll add more pictures when I get the new pan made. Tom |
| Tom C |
| Here is an update on the battery tray. 1) I sucked out all the garbage that was trapped in the scuttle using a long extension on my shop vacuum. There was 33 years worth of leaves and junk in there. Once it was cleaned out, I brushed in 2 coats of Rustoleum until it ran out of the ends of the drain tube. 2) Cut out all the rust on the verticle part of the scuttle and replaced with fresh metal. 3) formed up the battery tray with the ribs spaced as per the original. I will start welding the front arch first, work down the sides and finish with the back side of the firewall. This pannel is very critical. The arch is under a lot of stress due to lack of support. I had to use a C clamp to pull it back into position. I will post more pics after the welding has been completed. http://farm1.static.flickr.com/214/487310824_1675c0b5c3_o.jpg http://farm1.static.flickr.com/212/487337439_a273d9a61d_b.jpg http://farm1.static.flickr.com/208/487337489_5cbf81e122_b.jpg |
| Tom C |
| Man, I wish I could do that! |
| DON KELLY |
| Tom Always so nice to see pics of a TR6 comming back to life. Keep it up lad. Looks good! Beleive me...you will be rewarded in the end. Rick C |
| Rick Crawford |
| Where you been Rick? |
| DON KELLY |
| Tom, Here's an image of my battery tray as it now sits. I have the replacement from TRF, but will only use a portion of it since it does not have the hold down stantions as does mine and I'm unwilling to try to detach them and reweld to the new tray. Not that mine is rusted through only along the front and left. How are you addressing this issue? db 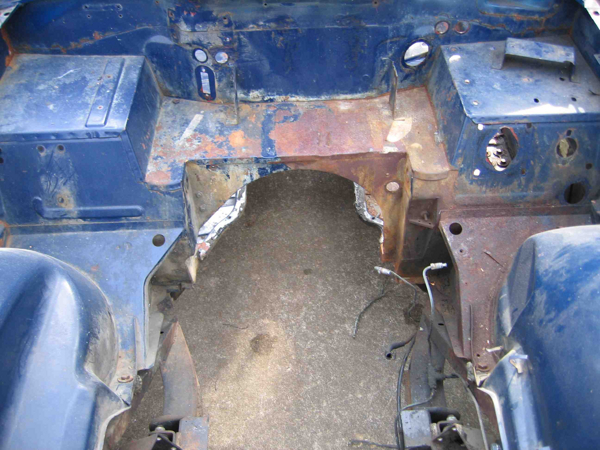
|
| Doug Baker |
| Hi Doug, There are three spot welds and a small fillet on each leg of the hold down stantions. I was able to drill out the spot welds and salvage the tie downs, it wasn't very difficult. You can see on the first set of pictures in this thread where they were located on the old tray. I will reweld them to my new tray sometime this week and post the pictures. Your tray looks to be in better shape than mine, if you are only replacing the front then I assume you are also drilling out the spot welds in the lip where it attaches to your arch? How deep are you going with the replacement - just to the end of the ribs? I welded the top face today and it came out very nice. The trick is that I welded a flange under the tray to help support/align it to the rest of the car. Good luck, Tom |
| Tom C |
| Don Quebec city. |
| Rick Crawford |
| Eh? |
| DON KELLY |
| Hello again, Time to close this chapter of the project: From the back side, I drilled holes in the flange and folded it up against the back of the firewall for plug welding. I used a 2x4 wedged against a floor jack to keep the battery tray from sagging. http://farm1.static.flickr.com/194/505179642_097d1db825_b.jpg Here it is welded up with a light coat of primer. I'll cover this with seam sealer later. http://farm1.static.flickr.com/192/505204405_6de687bf63_b.jpg Here is the front of the tray with the stantions welded in place. http://farm1.static.flickr.com/230/505204365_58fe4fc1da_b.jpg I'll finish this off with a light skim coat of filler to cover the welds. http://farm1.static.flickr.com/199/505204379_47cd05fe35_b.jpg Next (and final) big body project will be the rear valance TC |
| Tom C |
| Don In Quebec it is pronounced slightly different.....Éh Looks very good Tom! Rick |
| Rick Crawford |
This thread was discussed between 11/04/2007 and 20/05/2007
Triumph TR6 index