MG-Cars.info
Triumph TR6 Trailing Arm Bushing Question BBS discussion at MG-Cars.info

MG-Cars.info
Welcome to our Site for MG, Triumph and Austin-Healey Car Information.
Recommendations
Parts
TR parts and Triumph parts, TR bits, Triumph Car Spares and accessories are available for TR2, TR3, TR3A, TR4, TR4A, TR5, TR6, TR7, TR8, Spitfire and Stag and other TR models are available from British car spares and parts company LBCarCo.
Triumph TR6 - Trailing Arm Bushing Question
| Hi everyone and Happy Thanksgiving! to our US friends. I am installing new rear coils and a tube shock conversion. Left side done, today's curb side day. If I had more knowledge and gumption I would have removed the half shaft and replaced boots, cleaned and greased, etc. but alas... another day. The tube shock kit's brackets bolt right into the same holes used for the old lever shocks and looks good and solid. The old link is removed with the old damper and the bottom end of the new shock bolts to the back of the trailing arm where the link was bolted. The shock stands vertical with the iron bracket taking the strain/stress. The shock also prevents the trailing arm from dropping down too far so the coil spring does not fall out. We'll see how it rides next spring. I also bought new poly bushes for the trailing arm and have heard that it is possible to drop the front half of the trailing arm down enough to swap out bushes while it is still on the car - unlike what the Bentley manual instructs - a total re&re. I see that I'd have to disconnect the brake line mount on the arm and the shock to allow the downward pivot but would love to hear from anyone who has actually done this trick before I mess up! BTW, if anyone wants info or pictures on the tube shock conversion let me know. But, as I say, I won't know how the car rides until spring. Back to my cold garage... burr Ken |
| Ken Shaddock |
| Would not recommend the tube shock with the polys. Only my opinion. Who's tube shock conversion? Know of 2 cars with a conversion who had frame ripping at that point this summer alone. Would recommend checking into strengthening that area first. |
| DON KELLY |
| Thanks Don. The kit comes from British Parts Northwest. I think they are in Oregon... probably not too far south of you. The frame on my car looks fresh and strong in that area albeit factory so I will watch it closely. If I have to go back to rebuilt dampers so be it. My coils were original and toast as were the lever shocks. One was leaking. My rear end squatted badly... lottsa negative camber. Ken |
| Ken Shaddock |
| The last owner's where BPNW. I'd give em a call and ask them what they recommend for beefing that area up. Here is a photo of frame damage from their shocks. I can't give all the blame to them 
|
| DON KELLY |
| Ken Sounds like you will have a different ride this comming summer. Have no experience on dropping the front of the A arms. There is a very serious weak spot at the back wheels of a TR6. The outer axle and hub assembly comes out nicely as one piece. The "plastic" boots and u joints could be replaced. You do not want to attempt to rebuild the hubs at all. OK the weak point...Where the Hub is mounted to the trailing A arm are 6 studs and 6 nylock nuts. The problem is the steel studs are screwed into the aluminium trailing arms and only have 12 lbs torque on them. They are well known to strip out the aluminium. These studs are the ONLY thing holding the rear wheels on the car. Ken you might want to have a close look at these studs. If one does not know what he is doing (and I am NOT referring to you) when installing the outer axle and hub assembly, one could very easily over tighten the studs and strip them leaving one (OR MORE) less studs holding the rear wheel on the car. Fortunately there is a nice fix for stripped trailing arm stud holes. I fixed 2 on one side and one on the other side of mine when reassembling the car at time of restoration. Don K. Why do you say this...I am curious. "Would not recommend the tube shock with the polys". Rick 
|
| Rick Crawford |
| The polys don't dampen the shock to the frame areas. As most know this is the weak link to a 6 |
| DON KELLY |
| Holy moly Don... I will get in touch and ask them. Rick... thanks for this advice re the halfshafts. At this point everything works well so I'm hesitating before I tear it down. It's what I see that bothers me. One of the small outer boots was pulled back (the wire that holds it in place was undone and dangling loose) revealing dirty grease. It just looked like something I should clean up, re grease, etc. and of course replace all 4? boots. See picture... Ken 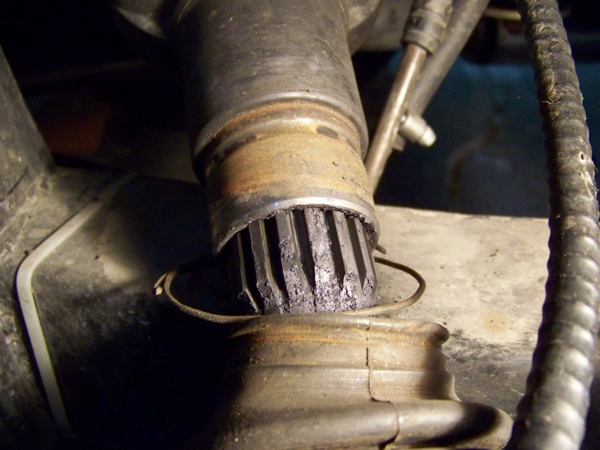
|
| Ken Shaddock |
| Another picture of the area of concern on the axle. Ken 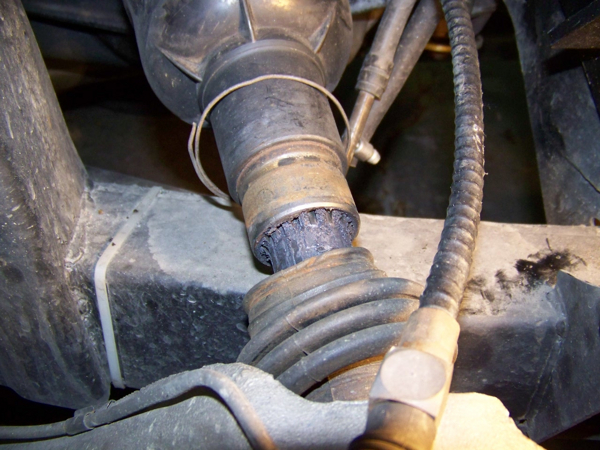
|
| Ken Shaddock |
| Don Here's an image of where you are saying my frame may break down due to the force from that gas shock. I have asked BPNW for their thoughts. Ken 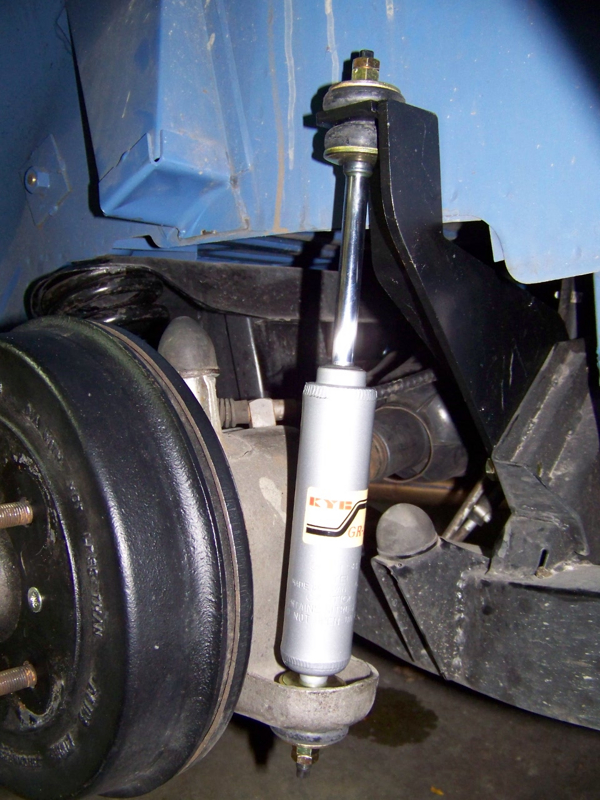
|
| Ken Shaddock |
| Ken, The conversion Don is referring to bolts to the body on the upper mount, and every bump and bounce is then trying to separate the body from the frame. Very bad. BPNW's kit is GOLDEN. Same one I have on my car. I also take exception to the poly bushing comment. I replaced the originals with polyurethane, then went with Goodpart's nylatron kit. So....here's my take: The harder Nylatron bushings, set up properly, allow the trailing arms to swing more freely. This allows the suspension to work properly, and the shock absorbers do their job.... absorbing shock! Here was the acid test: My wife said it rides better! It also corners better, and that made me happy. I've read the comment before about too much road noise and vibration being transmitted thru harder bushings, and from firsthand experience...I disagree. If you haven't fully committed to the poly's consider the Nylatrons and the adjustable trailing arm brackets from Goodparts. Although the brackets are kinda expensive, they allow you to adjust the camber without having to dismantle the rear suspension if you didn't get it right the first time with the stock brackets. One visit to the alignment shop, and that was it. Hope my rant helps......it made me feel better! Rod Don...did you eat enough turkey today? |
| Rod Nichols |
| One more thing.....I really think you would be better off removing the trailing arms to do the bushings. Remove the brake assy & hub from the trailing arm, (the 6 bolts/studs Rick refers to), Then slide the outer end of the halfshaft out, (looks like the boot is already loose there) and set it to the side. You will have to unbolt the e-brake cable, and the brake line is held on by a clip that routes it along the edge of the trailing arm. You can loosen the locknut on the brakeline enough to slide it off the mounting ear on the trailing arm. Wire it up out of the way on top of your new tube shock conversion bracket! That way, you won't have to bleed the brake system on re-assembly. You should already have jackstands under the frame at this point, so roll your floor jack under the trailing arm, remove the lower shock retaining nuts, and lower the jack. This should let the tension off the spring, and set it aside. You might need some dead weight on the back end of the car (put your wife in the trunk?? ;)...to keep it from jumping off the jack stand) Then remove the nuts and bolts (2 per bracket) that hold the trailing arm brackets to the frame, and everything should fall to the floor at that point. Note how many shims are with each bracket. You will most likely be putting those back just the way they came out. At least it worked that way for me. Maybe someone else would chime in here and advise the type of grease to use on the spline in your halfshafts. I never found anything acceptable, and that's another story I'm not getting into right now. I will add that I used nylon wire ties to hold the boots in place, never had a problem with that. I'm with Rick on the studs for the hubs....use a torque wrench, 12 lbs. That's it. Anything more results in catastrophic failure. Believe that. More is not better here. Steve and Rick...what did I forget? Good luck... :) ....and I apologize for the lengthy post! Rod |
| Rod Nichols |
| Another cause for a possible failure is the bump stop, if I remember right . Let me do some reading on that. Ken send me your e mail and I'll send you the conversation about the break don n kelly at comcast net |
| DON KELLY |
| Ken- all 1 word |
| DON KELLY |
| Don...I didn't look at the picture first time thru....hadn't heard about that one. I would be interested in learning more. Can you forward that to me as well? Rod |
| Rod Nichols |
| Don, I might be wrong, but I think the issue with the bump stop was, if you don't have one then the swing arm can travel too high compressing the shock all the way, then, the shock mount is the only thing stopping the swing arm. If that is the case, and there is still room between the place where the bump stop should be and the frame, the only thing restricting the swing arm is the shock mount where it is mounted to the frame. Then the frame breaks from the upward stress put on it because there was no bump stop to prevent the stress from happening at the shock mount in the first place. Rob |
| rw loftus |
| Rob-You could be right . I didn't really follow it very thoroughly as I didn't have the set up and probably never would. More interested in the coil overs. You are talking about the BCF 's thread? |
| DON KELLY |
| Don Still waiting on a reply from BP but I just spoke with a fellow who has restored LBC's for many years (mechanically, he's not a body shop guy). He deals with BPNW for all his parts. He has not seen this happen before. He says that BP has sold many of these kits without complaint. They design & make them and they know TR6's. He suspects that an earlier iteration of the kit, attached to a tired or weak frame may has caused this. Especially if there was a major bump or aggressive driving involved. Fair comment? PS. Email address should appear on this post. Rod/Rick I already have the poly bushes so I'll try them. I'm not opposed to doing things twice when I could have done it right the first time. ;) happens all the time. Learning as I go so no worries. From everyone's encouragement I think I will pull the half shafts off, regrease, do new boots and the bushes. You guys are awesome. Not today though. I just received new relays (horn & starter/bulb test) and a new fuse box plus I now have Dan Masters book so I'll play with electrics today. Disconnect the battery Ken, disconnect the battery Ken, disconnect the.... 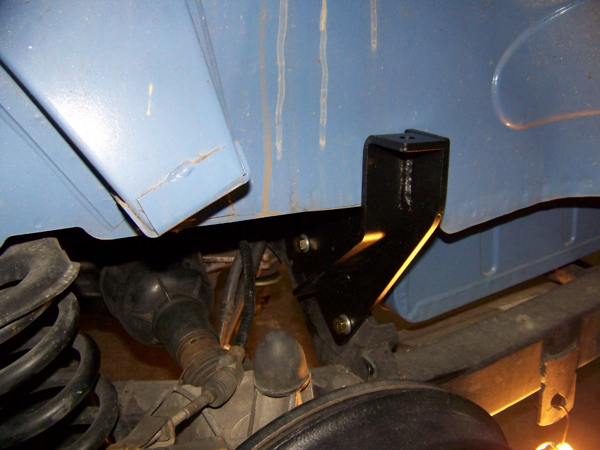
|
| Ken Shaddock |
| No Don, 6-pack. I have been following this issue fairly regularly because I am interested in this setup. There is discussion as to the pros and cons of this, taking into consideration the chassis issue. Some guys are saying that it is because of the location of the mount that this problem is occuring, but I don't see how because all of our lever shocks are mounted in the same place. I don't see how it could matter how the stress to the chassis gets there (whether through a linkage, or straight up from a tube shock). I personally think it is a combination of weak chassis AND stiffer (or not worn out) valving on the new shocks. One thing I have woundered about was what do the racers do? Are they allowed to use these kits, if so, they will be using valving a lot stiffer than any of us, are they breaking chassis mounts? If they can't use these kits, they will still be valving the leaver shocks way stiffer and using thicker oil than anything we will be using. Once again, are they breaking chassis mounts? I doubt it, or if they were, what have they done to solve the problem? Sorry to be a little long, but I don't think I've seen any discussion as to what the racers are doing. Whatever it is, maybe we need to think about it especially with stiffer shocks. Rob |
| rw loftus |
| Racers probably have to use stock set ups unless they're running some kind of IMSA event |
| DON KELLY |
| Maybe Don, I don't know. I guess what I was trying to say in my long winded way, was, the racers stress the crap out of everthing way more than we do on the street, and if the chassis proved to be a weak point at that location they would have found out about it a long time ago and solved the problem. Rob |
| rw loftus |
| Another thing that just occurred to me was, if you were having someone do some welding on your car for you, would you be happy with the work if it looked like some of the factory welding we've all seen on Triumph's? Just a thought. Rob |
| rw loftus |
| Assuming that I'm the correct Steve, Rod, you and Rick have pretty well covered those 5/16" hub mounting studs. Fine threads directly into cast aluminum, bad, bad, bad idea, but that's what we got. Good thing there are good fixes for stripped threads. I second the notion of Richard Good's adjustable trailing arm brackets and Nylatron bushings. Note that his bolts for securing the brackets to the fram are too short (unless he's changed them since I bought mine so longer bolts are in order. Also, he uses Grade 8 SAE hardware and to the standard this would place the threads in shear at one end of the trailing arm bracket. I use lots of AN/MS/NAS hardware and the solution is to use AN7-41 bolt for the trailing arm pivot. The AN7 is a 7/16 bolt and the 41 is a designator for the grip length. Grip lengths are in 1/16" increments as opposed to the 1/4" increments used for the SAE Grade 8 fasteners I also very lightly scuff the grip area, mask off the head and threads, then apply a solid film lubricant to the grip area. The BPNW damper mounts are essentially (or possibly) the same as the HVDA mounts and I haven't heard anything about them to put me off. I am using the Revington TR conversion with the adjustable high mount ant-roll bar. You have to gusset the frame by welding in two bits of steel sheet to upper spring perchs and welding in a reaction plate to the hole in the upper spring perch for the upper damper mount. The trailing arm also requires modification to give provisions for the lower damper mounts and to clear the damper housing as the suspension goes through its range of motion. Waht you wind up with is a damper that goes right up the middle of the spring, but it is not what I consider a coil over given the current usage of the term. |
| Steve Pike |
| Ken: below are some general findings on grease taken from another weblog ... splines on BMW bikes. Use a tooth brush and some solvent to clean both the inner and outer splines then apply a moly based grease to both surfaces covering all exposed metal. Don: bump-stops (the lack of) are the cause of rear frame failure at the shock mounts. Stressing in that vicinity is virtually the same from a stock shock to a moderately stiff telescopic shock. That said , a moderate amount of reinforcement on the underside of the shock/rear diff. mount is not a bad idea. Here's the grease story: There is a BIG difference between greases and they are not interchangable. This is from Snobum's website... he is a BMW MC guru and should be listened to ;) .... http://home.jps.net/~snowbum/chemicalsetc.htm He starts refering to the splines on the BMW final drive... but the article covers other types as well. 6. You can probably get away with one brand and type of grease, but I feel a bit differently, and suggest two or three. For instance: I like Chevron NLG1 (or NLG2, slightly thicker and better for wheel bearings and all the other places) Ultra Duty EP red grease. I use that grease 'as is' at various places. I also add perhaps 30%+ (NOT critical) of any common moly grease, for those applications where one would want moly added. If you have any left over Staburags or Optimol (two greases BMW use to recommend for splines at various times), it is probably OK to use that as the 30%+-. The Staburags reportedly may be very slightly abrasive, but I have seen little evidence of wear over many years of the above mixture, used at the clutch splines (transmission input shaft splines). This mixture of NLG1 (or NLG2) and a moly grease is a good mixture for use on the rear wheel splines on the twin-shock models, and those mentioned clutch splines. I have tried several types of greases for these splines, keeping track of condition after certain mileage's and type of riding/weather. I do not believe there is any perfect grease for these two applications. I have heard that Würth SIG 3000 may be quite good at the input shaft, it does NOT appear to the eyeball to contain moly...and I have installed some, but have no LONG term testing as yet to report to you. Mercury Marine outboard grease also works fairly well (Napa 18-9200). You can substitute Texaco Starplex 2 'with moly' (should be purchasable both with moly and without). Also, you can try Caterpillar spline lube: "Desert Gold Grease 129-1939, NLG1-2, with 5% moly." Honda "Moly 60 PASTE", available at their motorcycle dealerships, has also been reported as excellent by many folks. Folks have used that Honda grease by itself, with reasonably good results. A grease that intrigues me, but I have not yet tested it, for splines, is Ford's Teflon based grease, Ford part number is D2AZ-19590-A. There are also some very fancy new greases based on Teflon-like substances, but I have no information...YET. BelRay has an Assembly Lube....which is also marketed by their industrial division as Molylube Antiseize 15.....There is a report that this stuff has been doing well at the splines. Has an aluminum complex base, 15% moly solids, supposedly GOOD at preventing corrosion and fretting and has lots of water resistance. ****Do NOT use moly greases in wheel bearings or in the steering head bearings. Moly tends to change to stiff flaky bits if used in those roller bearing applications. As a general rule, do not use moly containing greases, oils, etc., at any place there is rotational speed differences, or in ball bearings, needle or roller bearings, and most sleeve bearings. Moly is GREAT for most SLIDING surfaces. The red Chevron grease I mentioned above, withOUT moly, is particularly good for water vapor resistance; and, if you live in snow country, is excellent for those easy-to-wear-out universal joints on your 4 wheel drive truck. It is excellent for the BMW clutch throwout bearing parts, and pretty good for many places on your bike that need grease. It comes in standard grease gun tubes. You'll probably have to go to a Chevron distributor, not a gas station. While the Chevron red grease IS usable for wheel bearings, I prefer a different grease for them, but you could use the NLG2 for the wheels. You could simply stock NLG2 Chevron EP Ultra duty, some moly grease or Honda 60 paste, and those two would suffice for all your greasing needs...EXCEPT where silicon grease is far better...like at rubber parts such as petcocks and for electric connections. I am undecided if the special Bosch greases used at the automatic timing advance unit are better than the Chevron. Moly grease may be available cheaply in olive drab pound cans, at your military surplus dealer. I am still using some cans of this stuff I purchased a long time ago, manufactured in 1966! For those anal enough to want to know, here are the main items printed on the can, and the name and number is below. But, for most, just get the Honda 60 paste or a similar moly grease, if you do not have any type of moly grease on hand already. G353, GMD, Grease, Molybdenum Disulfide, MIL-G-21164B Some folks have had good results with using anti-seize compound on the clutch splines (AGAIN, this is actually on the transmission input splines ONLY, NOT the clutch disc splines with which it mates). Since anti-seize also has anti-corrosion properties, this may, in fact, work OK...but I have NOT tested it for this purpose. My suspicions are, without the slightest shred of proof, that the NICKEL antiseize's would be good. A property of greases that is not well appreciated, besides lubrication and moisture resistance, is that for sliding surfaces like splines, you want some grease to remain on the parts and not be forced out or sc----d out. Not all greases are good at this. IT IS THESE PROPERTIES of staying in place and of thin-film moisture resistance THAT ARE THE MOST IMPORTANT FOR THE clutch/input shaft SPLINES!! 7. For those of you with mechanical ignition with points, you can use any of the greases mentioned (without moly) in this posting, but Bosch does make greases: FT1V4 (5-700-002-005) just for the cam felt (and FT1V26 (5-700-005-005) just for the automatic advance guide shaft). If you decide to purchase these... not at all REALLY necessary IMHO, the small tubes will last you and about 50 members of your local club, the rest of your lives. Ford also made a distributor cam grease (felts too) number C4A2-19xxxx, but I am not happy with that one. My feeling is that the red grease without moly or the Bosch is just fine for the ignition parts on the pre-1979 airheads. Frankly, it is likely that any soft non-fibrous wheel bearing grease that is OK for disc brakes, will also work, as they should not melt and be thrown off easily. I've used BMW #10 red grease, and I've used the Chevron without moly, both are fine for this purpose. It is important that the ignition cam be very faintly greased, as if it runs dry, it may squeak, and case fast wear on the ignition points rubbing block, closing the points. The inside of the ATU also needs greasing. 8. I feel that for the wheel bearings you should 'consider' purchasing a REAL wheel bearing grease. BUT, again, that Chevron NLG2 mentioned previously DOES do a great job. The grease I have had the best results with (extremely long shelf life, does not separate, is not fibrous, and sticks and lubricates really well, and has decent water resistance) is Quaker State Multipurpose Grease and Wheel Bearing Lubricant. This grease is a NLG1 type of grease, similar in some respects to that red colored Chevron grease I mentioned...but different characteristics for these purposes, and is thicker. Rob |
| Rob Gibbs |
| Don I checked in with BPNW. They offered the following: "What breaks the mounting points is if the top bump stop is NOT installed. By not having the upper stop, the shock will go solid and bottom out, transferring all of the force to the frame." I'm optimistic about my conversion and will report next spring summer from personal experience. I won't seek out potholes for testing but we have some entertaining country roads here in Lake Country, Ontario so I'm looking forward to a great ride on them. Now if I could only get the squeaks out of the front end... Ken Rob The grease info is interesting. I would have slapped on some plain Jane wheel bearing grease or some moly without much thought and would have paid more attention to cleaning than lubrication technolgy so thank you. I'll read through that piece carefully. Ken |
| Ken Shaddock |
| My question (which may go unanswered) is what were these cars doing when the damage occurred? The thread forwarded to me by Don K began with the guy saying his nephew "launched" the car 3 times. Launched? as in a drag racing start? Not sure about that.....!?!? I'm not ready to pull mine off the car, and have quite a bit of confidence in BPNW. Greg & Layton are good by me. I keep thinking of one of Murphy's (many) Laws: Make something idiot-proof, and only idiots will use it! Is that why we drive TR6's? :) Rod |
| Rod Nichols |
| Thanks Rod... they've been helpful here too and their stuff seems solid. Knowing the state of my frame and having installed the kit I can say that a future breakdown is not on my radar. Then again... I'm a rookie at this LBC hobby. Ken |
| Ken Shaddock |
| Don... received that chat thread, thank you. I'll watch my set up closely next spring. If I hit some major dips in the road at speed or God forbid, a serious pot hole, I'll inspect. Right now I feel fairly comfortable trying this conversion out. Have my old dampers on the shop shelf just in case the ride seems far too abrupt and potentionally dangerous. Ken |
| Ken Shaddock |
| Has anyone seen the Ratco shock-in-coil conversion similar to the Revington setup? It's relatively cheap at $200 including shocks and apparently doesn't require welding, but is limited in shock selection to Monromatics. Ratco says they haven't found a performance shock to fit. http://www.rat-co.com/coil%20overshconversKit.html Ken |
| k v morton |
| Hello Ken, I've been running with the discussed tube shock conversion - KYB shock - for 7 years now and have not had a single problem. The other big difference is setting up the rear end. Get a full four wheel alignment. It cures the squats and looks and rides much better. I highly recommend it. Steve |
| Steve Crosby |
| OK Steve, will do. I did not buy adjustable brackets for the trailing arms but will keep the existing shims if any and will re&re as per original set up. I will indeed go to an alignment shop to make sure toe is correct after coming this far. I will also put new rubber on the car so I don't want to scrub them off prematurely. Thanks for the shared experience re the KYB shock set up. The parts and frame looked good on my car so I'd be surprised to see my frame break up as per the pix Don has shared. Time will tell. Livin' & Learnin' Ken |
| Ken Shaddock |
| Ken Remember the CD has a procedure for remove of the back braikes and hubs. Have a very close look at the U joints. If they do not look new then replace them. It is more than worth it to do it when you have the rear apart...the first time. Rick |
| Rick Crawford |
| Perfect, thanks for the reminder re CD Rick. Been too cold lately to venture out there and get into it. Ken |
| Ken Shaddock |
| Ken, The shims impact toe settings only and do not address rear camber. The factory had nominal set ups, but even that failed to address camber fully. The TR IRS crowd has some unkwown soul for coming up with a full set solution using the stock brackets, various combinations of the 1, 2, and 3 notch brackets with notch orientations up and down can cover it properly. But this means setting a baseline, measuring camber, then disassembling and going to a different set of bracket notch and orientations and measuring again. There is a table with the camber ranges adjustments covered by all of the various combinations somewhere in the archives. Or you could just get the adjustable trailing arm brackets from Richard Good. You assemble everything and then adjust the brackets accordingly to achieve the camber setting you seek. I know our local alignment guys hates doing TR6s because of the stock rear bracket situaion, but he loves those adjustable brackets. |
| Steve Pike |
| Very good Steve, thank you. I'll learn about those adjustables. I was hopeful that new springs amidst the factory set up & parts would have dealt with the neg camber. I would have been pretty ticked if the squat remained after doing the spring, bush, and shock work. You guys are saying me from some longer term frustration which I appreciate. Ken |
| Ken Shaddock |
| Hi All, new to this forum. Saw the photo with the cracked frame crossmember and thought it looked familiar. It is indeed mine from either 6-pack or BCF. Let me give you some facts to clear up any misconceptions about what may have happened here. The frame on my car was in excellent condition, with zero rust or damage. Stock lever-action shocks do not deliver the same torquing action on the frame crossmember as do shock towers. I was running Spax tube shocks set on medium action. New bump stops were in place. The shock towers were placed 3 years ago and in the last few months a creaking noise was evident. Then a loud pop. I cut out the ruined stock cross member with a plasma torch and die grinder and have since welded in a new Ratco heavy-duty crossmember with frame stiffeners. The OE crossmember is not designed to handle that kind of stress. There have been a number of these failures because of the tube shock conversion. I knew about the risk of installing this setup when I originally did the conversion. I did more homework than the average enthusiast before settling on this particular setup from BPNW. It is going back in, with new Spax shocks, this week, after I place all new inserts into my trailing arms along with new GoodParts adjustable brackets. Sorry to be so long-winded. I am not blaming any vendors for the failure, I knew about the inherent weakness before I modified the car. Oh, and modified it is. |
| BK Karam |
| Thank you BK. I have quit working on my 76-6 due to the cold and snowbirding outta here but will finish the TA's and axle / boot work in spring. I'm determined to give this BPNW conversion (KYB shocks) a try. My driving habits are tamer than they were in my youth so hopefully all will remain intact. Appreciate the clarification. Ken |
| Ken Shaddock |
This thread was discussed between 27/11/2008 and 07/01/2009
Triumph TR6 index