MG-Cars.info
Triumph TR6 Valve Cover Gasket Question BBS discussion at MG-Cars.info

MG-Cars.info
Welcome to our Site for MG, Triumph and Austin-Healey Car Information.
Recommendations
Parts
TR parts and Triumph parts, TR bits, Triumph Car Spares and accessories are available for TR2, TR3, TR3A, TR4, TR4A, TR5, TR6, TR7, TR8, Spitfire and Stag and other TR models are available from British car spares and parts company LBCarCo.
Triumph TR6 - Valve Cover Gasket Question
| Hi Guys: The long awaited startup has been constantly delayed and although it's now December I will proceed with the process and get it running before Christmas even if I can't drive it. Question: I bought an alloy valve cover from Moss and note it doesn't have the recess for the thick cork gasket like the stock valve cover. Dry fitting the cork gasket with the alloy cover indicates a problem fit and it's so thick I don't have much stud showing to attach the securing nuts. I don't want to disturb the Loctite and lengthen the studs. Is Permatex black a good application for the alloy valve cover with no cork gasket used? Has anybody out there done this or have you used the old cork gasket with your new alloy cover. Your shared experience as usual would be a help in solving this little problem. Cheers, Bob 
|
| Bob Evans |
| Bob- There is an online seller who makes a poly gasket for the Alloy cover . Suppose to be a big improvement. Better yet , use the stock cover with the gasket that Joe Alexander is now selling |
| DNK |
| Bob-I recently acquired a used alloy valve cover and it is probably came from the same source as yours. The studs are just about even with the top of the vc, but the nuts have a long shank that fits into the vc., similar to the nuts used on alloy wheels. Does this sound the nuts you are using? Berry |
| BTP Price |
| Don: When ordering from Moss I asked for the "new" silicone gasket but they sent the cork one. The stock cover, although sanded, painted and pretty is no longer an option on this build as I've bought the alloy with the knurled knobs and the one with the Triumph Book Logo for the middle one. I thought I could get a nice, thin silicone gasket for this application. I will search for this poly gasket you mentioned. Berry: No, the shanks do not fit into the valve cover. They have a rubber seal that mates with the top of the VC. I think I'm going to use the Permatex Black without the cork gasket. I've used Permatex in other places with good results so this is worth a try. Cheers, Bob |
| Bob Evans |
| You know Bob, people have had problems with oil blow by,so to speak, with those covers |
| DNK |
This is what Paul Rego found when he pulled his manifold for his "trip" set up installation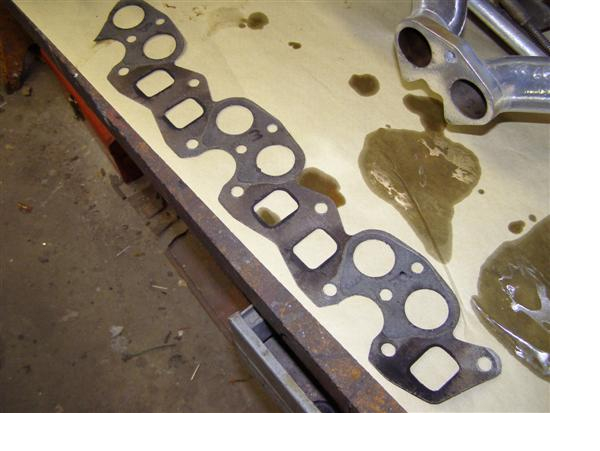
|
| DNK |
| Ouch Don! I can see the design being prone to leakage but blowby into the intake seems entirely another matter. I'll have a look at Paul's site to look for his comments. Don't know why Moss continues to sell Made in China junk when there's so much better stuff out there. The oil cap, for example has only about 1/8" turn before it locks on the VC. Seems flimsy to me. I'd like to see an alloy VC with a recess for the gasket and if I find one I'll probably buy it and sell the one I have. May just go with the stock VC for now for initial start up and winter storage. Thanks all, Bob |
| Bob Evans |
| Bob-I think your problem is with the knurled nuts. The nuts I described can be used with the cork gasket and the previous owner even added some copper crush washers for a better seal. I have only had the vc for a few months, but leakage is not a problem. Any leakage might be a result of a vent issue. I can send a picture of my nuts if desired. Berry |
| BTP Price |
| Here is a pic of the nuts that should have been included with the vc. Berry 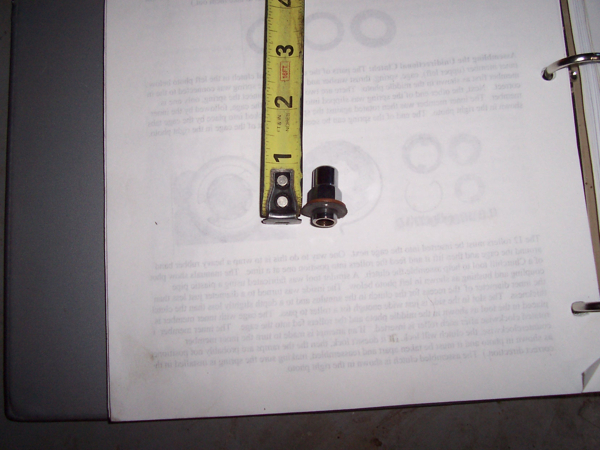
|
| BTP Price |
| Bob I sold my alloy valve cover to someone on the board a while back, as it wouldn't fit with something else I had fitted. Anyway, before selling it, I used a standard cork gasket, and I attached it to the cover using blue hylomar. To get it to stay in place while the hylomar set I used wooden clothes pegs around the outside - probably a dozen or more to keep it straight. I also stole a baffle idea from someone on this board (maybe Rick Crawford?) to avoid that oil in the breather problem. A piece of thin aluminium maybe 2 inches square and some wire is all it took. The aluminium is easy enough to cut and you can see how big it needs to be to cover the port on the side of the cover and prevent splashing of oil through the breather pipe. Hold it in place with the wire (I think I drilled a couple of holes) and the two ends of the wire then pass through the breather hole and they are held in place by doubling back over the pipe when you push the hose into place. Not sure if that makes sense in words - I wish I had a picture as it would be immediately clear! Cheers Alistair |
| A Hewitt |
| got a diagram of that somewhere |
| DNK |
| This is how I baffled my aluminum valve cover. It is a strip of thin aluminum that was formed, then bonded to the inner surface of the cover using a high temperature adhesive. After the adhesive had set, a couple of small holes were drilled and some 1/8" solid aluminum rivets (MS20470AD4-don't remember what grip length) were added for the belt and suspenders effect. I am using the standard cork gasket with this cover bonded with a gray hylomar, either Hondabond or Yamabond. I've found a local motorcycle dealer that sells the stuff at a decent price and what they have varies by Honda or Yamaha having a lower price on the smuhtz at the time of order. I think that a gasket could probably be made on a form in place basis if you were take something like wax paper or plastic wrap and place it on the cylinder head mating surface as a barrier layer, then apply a layer of hylomar on the valve cover and fit it to the engine being careful to get a uniform distribution of the hylomar. You would need to ensure that your squeeze out would be such that you left a reasonable film thickness. On cure, you could then remove the cover and peel away the wax paper or plastic wrap. 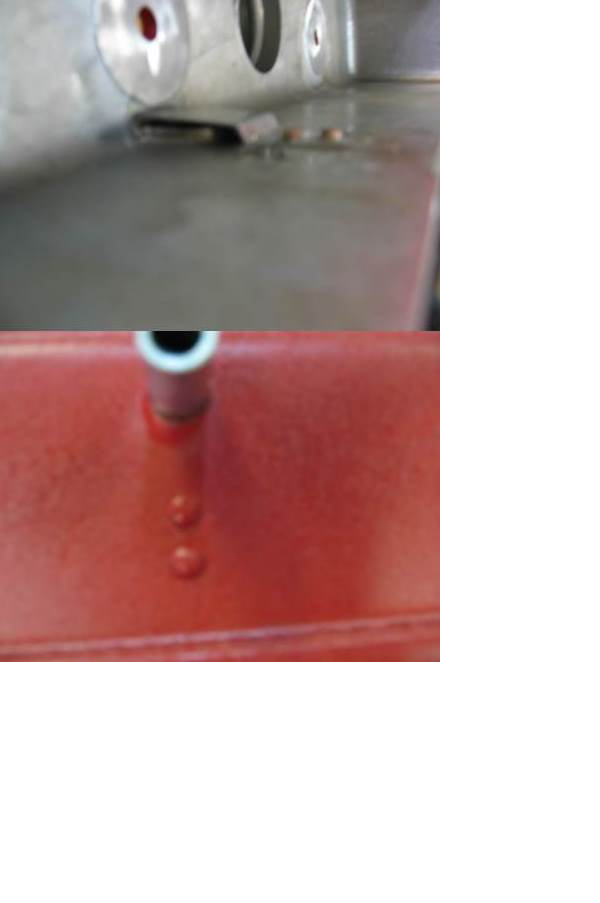
|
| SteveP1 |
| Thanks everybody. Berry; thanks for reminding me of the nuts supplied with the VC. Now all I have to do is find them in the multiple boxes of parts I have. Ironically, only the old stuff is sorted , tagged and stored properly; the new stuff is somewhat haphazard. Like the baffle idea too. Don: any pics you have would be great. Thanks again to all, Bob |
| Bob Evans |
| Many years ago bob I think that Steve pretty much documented it |
| DNK |
| Allow me to throw another stick in the spokes here.... When I rebuilt my original engine 2 yrs ago, I used the same alloy cover that was on it in 2003, also on the replacement engine til 2010. During the initial startup (2 yrs ago) I had a HORRIBLE scraping noise, and the ensuing investigation revealed the valve spring keepers were scraping the inside of the alloy cover. Just what ya need....aluminum filings in a brand new engine? (It all worked out okay) Moral of the story: check your valve spring keepers for clearance! |
| Rod Nichols |
| Rod, I'm assuming that the keepers were hitting along the side of the valve cover, correct? With the thicker walls of the cast aluminum cover, there's not a lot of clearance available and I noted that sometimes I had to shift my cover location after pulling maintenance due to the same thing. Just loosen the nuts a bit and give it a slight shift to the side, tighten down the nuts and everything was OK. The other thing I found with mine was that due to its design (it was an old style cover that isn't sold anymore), the recessed bosses for the mounting studs fouled the roller rockers I had installed. I made a template for transferring the hole pattern then flipped the cover upside down on the bed of a milling machine and milled away those recessed bosses, leaving some pretty large holes. Some discs were cut out of .250" 6061-T6 aluminum plate and welded in place. After that it was back to the milling machine to flush the surface on the outside and plane off the surface of the welded in discs on the inside. Transferred the holes, and since there were tool marks on the upper surface where the welded in discs were located, decided that some paint for what was a polished cover was in order. Since I had some red wrinkle paint sitting around, decided to go for the "Testa Rossa" look. |
| SteveP1 |
| Everybody should wish Rod a Happy Retirement He is officially an "old guy" |
| DNK |
| Steve, I did "hog out" the holes for the mounting studs on top, and also ground a bit on the inside where the spring keepers made contact. Not a problem since. I am careful about where the cover sits before tightening down! Except for shorter push rods to accommodate what was taken off the head for 9.2 to 1 compression, valve train is stock. Gave it a nice little bit of 'giddyup'!! Rod |
| Rod Nichols |
This thread was discussed between 02/12/2013 and 23/12/2013
Triumph TR6 index